In this article
Experience the latest Flex release, delivering system-wide advancements for enhanced security, core operational functions and industry compliance.
- December, 2025 – Release 2025.4 ↓
- September, 2025 – Release 2025.2 ↓
- June, 2025 – Release 2025.2 ↓
- February, 2025 – Release 2025.1 ↓
- December, 2024 – Release 2024.4 ↓
- October, 2024 – Release 2024.3 ↓
December, 2025
Flex Platform | Flex CAD | Flex GIS | Flex Apps | Flex Records | Flex Jail | Flex IBR
Flex Platform
Java Update
The 2025.4 release will feature an upgrade to Java 21 on the Flex Server to help address security vulnerabilities present in earlier Java versions and allow for the remediation of security issues in older libraries. There is no impact or system requirement changes for Flex clients; the Java 21 upgrade is a server-based component only.
What will be impacted
- The Legacy PictureLink interface will no longer function, due to its unsupportability by PictureLink. The updated PictureLink Interface, which uses Data Exchange (DEX), will not be impacted
- Third-party interfaces, installed on the Flex Server, that are not provided by Motorola Solutions
What will not be impacted
- System and hardware requirements for the server or client
- Anything on Flex clients, including pre-requisite software requirements
- Interfaces provided by Motorola Solutions
Go back to the top ↑
Flex CAD
CAD Web Client
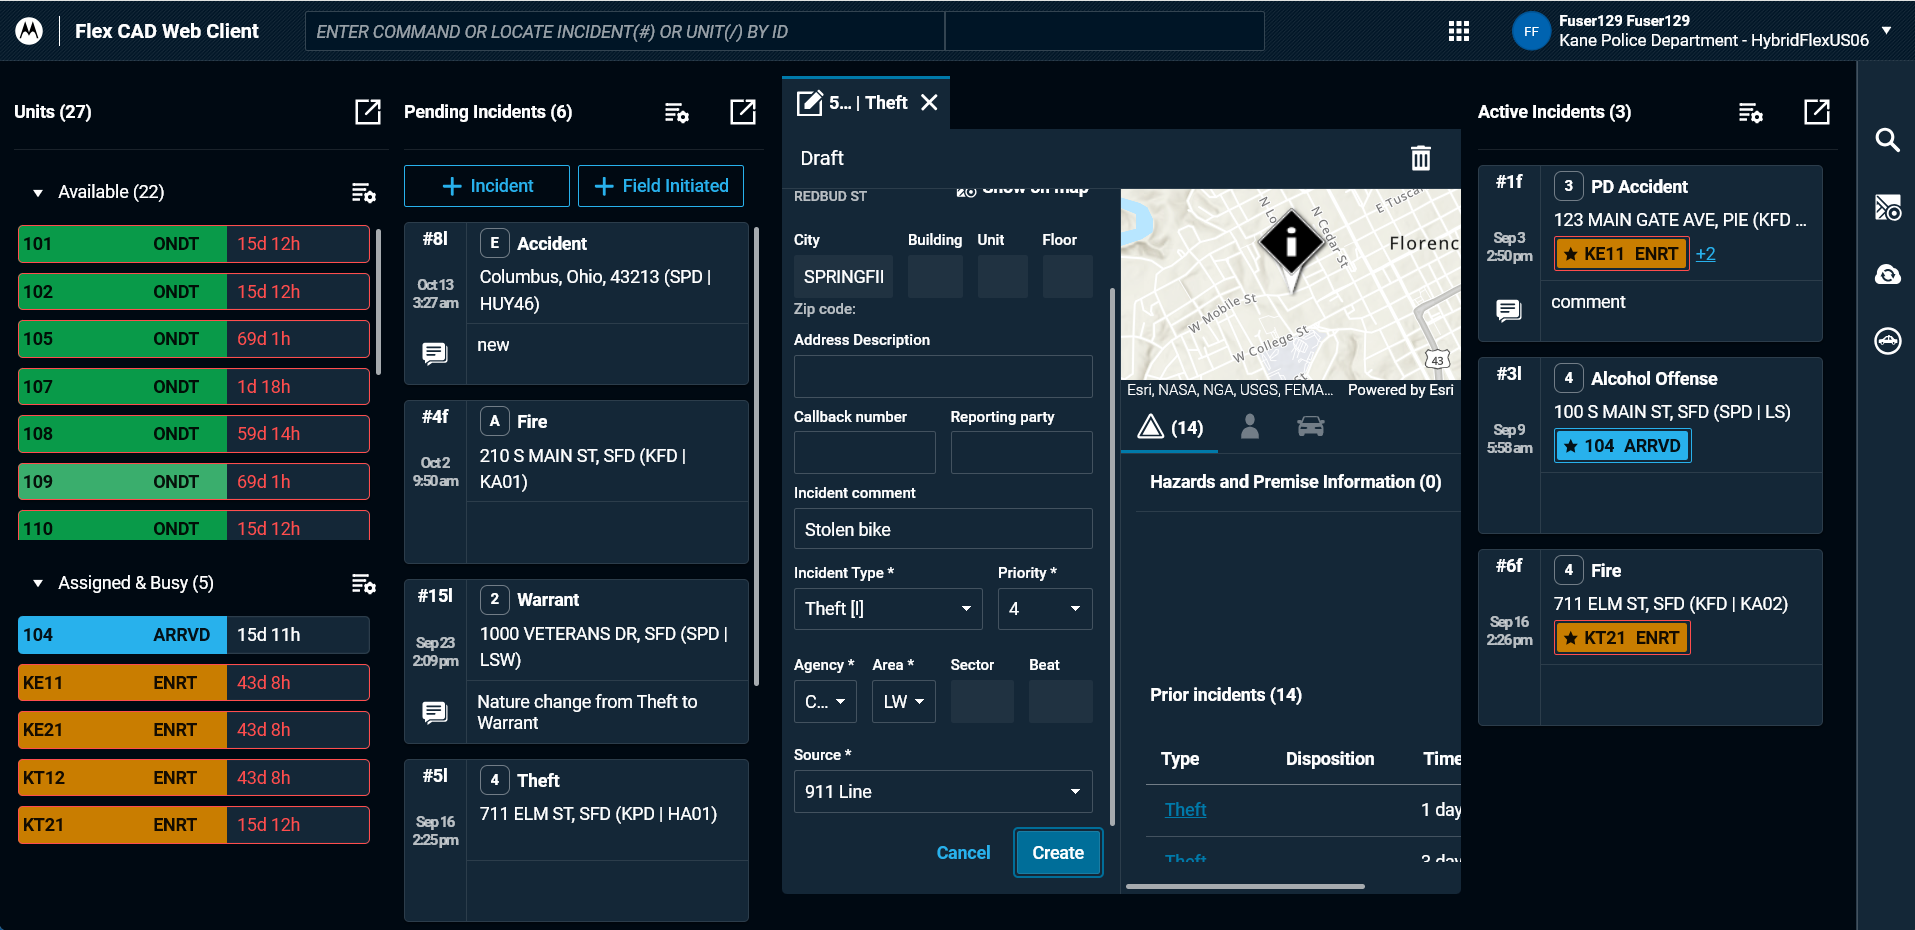
The 2025.4 release brings one of the most anticipated updates of the year: the CAD Web Client with basic incident and unit management. The new functionality includes: adding new incidents, updating incidents, placing units on and off duty, dispatching units to incidents, updating unit status, closing incidents and more. The CAD Web Client is fully powered by the Flex CAD backend, but still allows a browser-based interface with a modern UI. Not to mention faster deployment of new features as AI-enabled functions start to be integrated into the CAD workflow.
Your agency will need to be on the Flex subscription in order to enable this CAD Web Client functionality. If your agency is not yet on a Flex subscription, contact your Account Sales representative.
Automatic Name Search Updates

The Automatic Name Search feature in CAD scans incident comments for persons or vehicles and automatically runs queries via Message Center. This will simplify searching and associating people with a CAD incident. A new color-coded icon next to the comments field now clearly indicates the feature’s status: green means the parser is active and monitoring for names/vehicles; red indicates the parser is configured, but Message Center isn’t running; and gray signifies the parser software is not yet properly configured or installed.
Additionally, the system can now identify and pass along sex and race information for person queries found within the incident comments. These updates are available in version 2025.4. There are no required settings to enable this update.
Relationship Field for Involved Persons
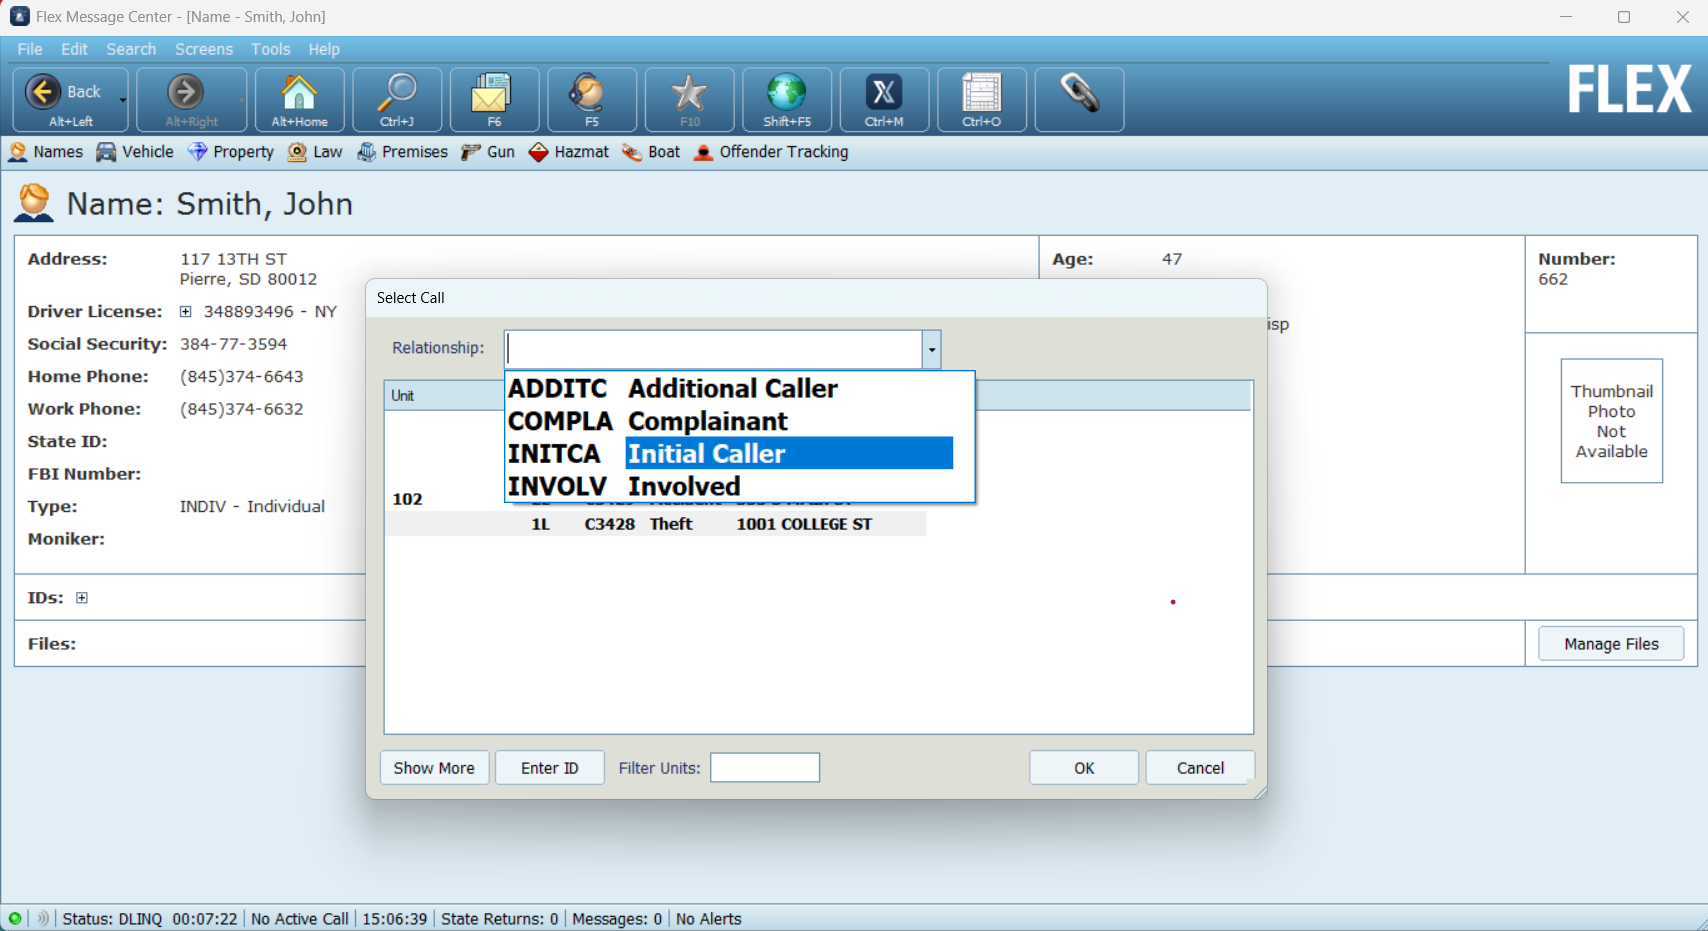
Accompanying the updates to the automatic name search feature, you can now add those queried individuals back to the CAD incident. Call takers and dispatchers can specify names that are associated with a CAD incident, along with their relationship to the incident, such as caller, witness, victim, etc. This will save valuable time and allow others to quickly understand the role each person is playing in the incident.
The list of available relationships is configurable to your agency by defining it in the tbcdinvp code table. This update is available in 2025.4.
Go back to the top ↑
Flex GIS
Automatic Zooming in CAD Map
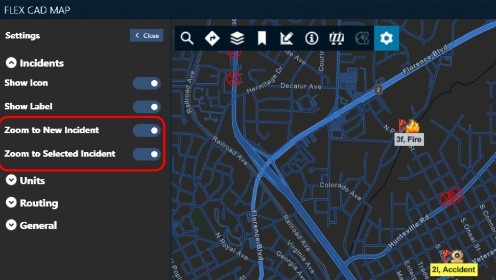
This update brings a couple of new settings within the new Flex CAD map. These provide the ability to automatically zoom the new CAD map to new and/or selected CAD incidents. This will save call takers and dispatchers time because they won’t have to find the incident they are working with on the map; it will be zoomed in and ready to go for them.
The default is for the zoom settings to be disabled. To turn them on in the CAD map, go to:
- Settings > Incidents > Zoom to New Incident
- Settings > Incidents > Zoom to Selected Incident
- Settings > General > Default Zoom Level
Lengthened Address Fields
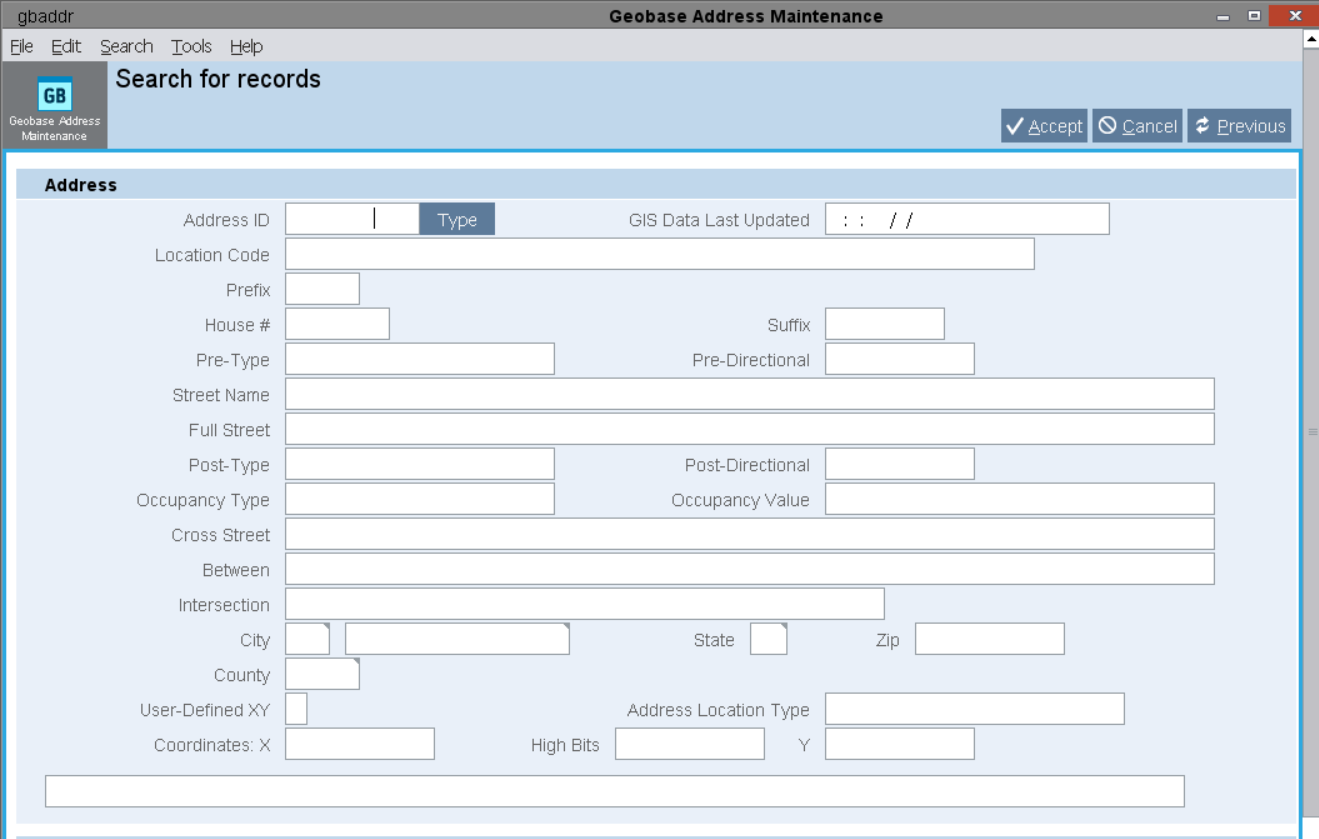
To align with the NENA CLDXF standard for Next Generation 911 (NG911), several address fields in Flex have been significantly lengthened. This change accommodates GIS administrators who need to store full address component names, such as “Boulevard” instead of “BLVD” or “South” instead of “S,” since the previous character limits were too restrictive for this detailed formatting. By expanding these fields, Flex now supports the standardized GIS data schema, simplifying maintenance for GIS personnel who no longer need to manage separate, shorter fields specifically for Flex.
Select new field lengths include:
- gbaddr.pretype 50
- gbaddr.predir 10
- gbaddr.posttyp 50
- gbaddr.postdir 10
- gbaddr.stname 254
For a full list, reference the release notes or watch the following Chat With Flex Product webinar.
Go back to the top ↑
Flex Apps
Redo Transaction

This feature is designed to eliminate repetitive manual entry. Instead of rescanning a large batch of items—such as evidence returning from a lab—users can now simply look up a previous transaction and select “Redo Transaction.” This action automatically pulls in the existing list of items, allowing you to quickly update the necessary details without the need for individual rescanning.
This update is a significant time-saver for staff who frequently handle high volumes of items, streamlining the workflow and reducing manual effort. It’s available in version 3.4.0 of both the Evidence and Jail apps.
Evidence Audit Report
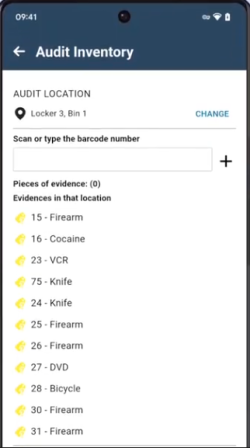
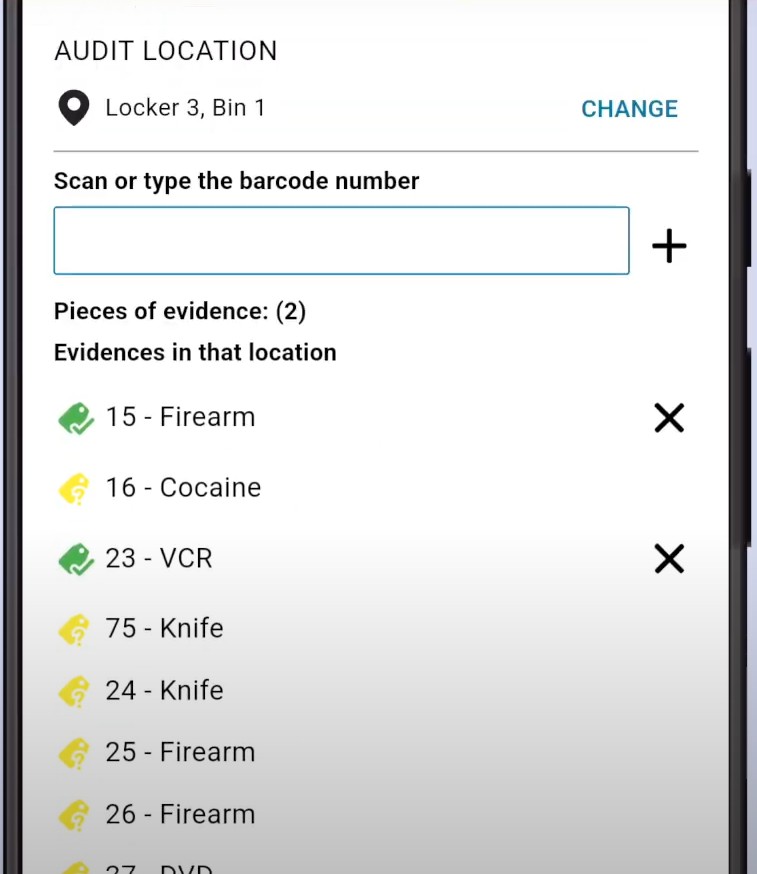
The Audit Report has been significantly updated to provide better visibility during evidence inspections. Previously, users had to scan every item in a location blindly before running a report to identify missing pieces. Now, once a locker, bin or location is selected, the system automatically displays a complete list of all evidence that should be present. As you perform the audit, scanned items will change from yellow tags to green, providing a real-time visual confirmation of your progress.
This ensures that if a tag remains yellow, you can verify if an item was truly missed or is actually missing from the bin before finalizing the report, making the entire audit process more accurate and efficient. This newest feature will be available in 3.4.0 and 2025.3 and higher.
Cell Checks
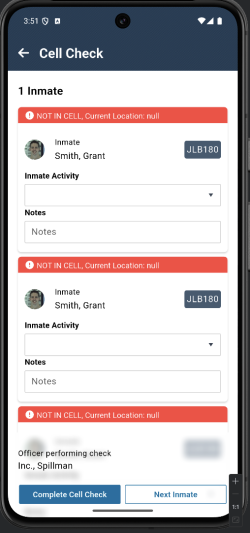
The cell check process has been significantly improved to save time and increase accuracy. Previously, officers had to scan each bed barcode to record activity, which could be tedious for multi-inmate cells. Now, you can simply scan the cell location barcode to pull up a complete list of all assigned inmates at once. This allows you to log activity for the entire group in a single step.
If an inmate is assigned to that cell but is currently logged elsewhere, a red banner will appear at the top of the screen. This alert not only indicates the inmate is out of the cell but also displays their current recorded location, ensuring staff have immediate and accurate oversight of all individuals. This update will be coming out in 3.5.0 and will be available in 2025.3 and higher.
Go back to the top ↑
Flex Records
Expungements

We are excited to announce this long-awaited feature, now available in 2025.4. Launch this new function via the command line, which will then open a web browser. Simply enter relevant court information and the reason for the request, and upload the official expungement order. Then, you can search for a person’s name record, view all associated involvements and select multiple records to expunge simultaneously with a single click. Hitting the “Expunge” button moves these involvements and the name record into a separate, designated partition. This ensures that normal users can no longer view the sealed records, while Super Users and SAAs retain access. It’s important to note that no records are being deleted during this process.
See the Sypriv – expungement setting to enable this feature.
CCAssetSync Cloud Status
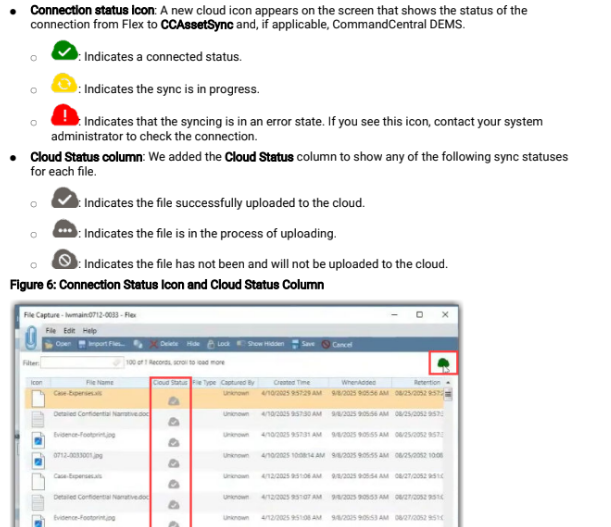
With this newest update, we’re improving the overall user experience for CCAssetSync. No more guessing if everything has been uploaded correctly. First, we’ve added three cloud status icons to indicate your agency’s level of connection to the cloud: good connection, still in progress or connection failed. Second, we’ve added cloud icons to each file attachment as well, so you can see its upload status with just a glance: successfully uploaded, in process or not uploaded.
No settings are required to turn this on. This update is included in 2025.3 and higher.
CCAssetSync File Counter
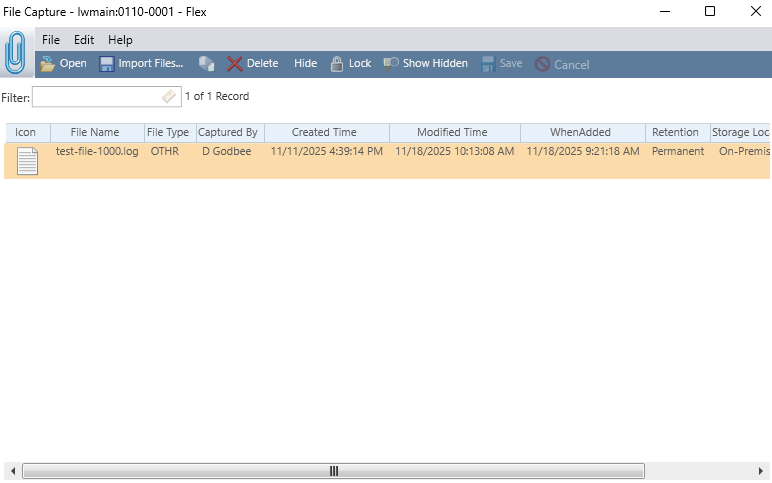
The second update made to CCAssetSync is a new file counter to indicate how many files are currently being viewed. If there are too many records for the system to count at the time, a “?” will appear rather than a number. However, as the user scrolls down and all of the records load, it will finish off the counter with the correct number.
A modified time was also added to each file. This means that if a file has been uploaded and another file with the same name is uploaded, the system will allow the upload to take place, but it will issue a warning that the file is being modified. The modified time will show when the file was updated in addition to when it was initially created.
No settings are required to turn this on. This update is included in 2025.2 and higher.
Go back to the top ↑
Flex Jail
Civil Process Mileage Popup
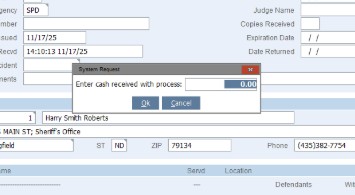
A long-standing issue for users of the Civil Process feature has been resolved. Previously, a mandatory pop-up window requiring acknowledgment would appear every time a civil process was entered, even if the mileage charge was set to zero. Now, if the system parameter for mileage charge is set to zero (meaning you are not charging for mileage), the unnecessary pop-up window will no longer appear. This improvement is included in version 2025.2 and all subsequent versions.
To enable this, configure the apparam cpmilesr setting.
Go back to the top ↑
Flex IBR
Bond ADMINUTIL

Much like in previous releases, we’re continuing to improve the experience around bonds and warrant fields on the Mobile arrest form. Previously, the ability to add bond and warrant numbers in the Mobile Arrest form was added. With this newest release, we’ve separated the warrant number and the bond information, enabling agencies to determine whether the bond information is visible.
For those who do not want officers to enter the bond information, administrators will set the new “Adminutil Modules.ibr IsBondINformationOnArrestVisible” setting to false. This will turn off the bond information visibility while keeping the warrant number in the form. This new functionality is available in 2025.1 and higher.
Go back to the top ↑
September, 2025
Flex Platform | Flex CAD | Flex GIS | Flex Apps | Flex Jail | Flex IBR
Flex Platform
Unified Identity Integration
We talked about it during Summit 2025, and we’re excited to officially release Unified Identity integration in 2025.3! Unified ID enables your agency to have a single sign-on process for Flex and all other Motorola Solutions products. This will greatly simplify workflows for agencies that use products like CommandCentral or VESTA, and eventually all Motorola Solutions products. We’ve also had a lot of customers asking to connect Flex with their own IDM provider, such as Microsoft Entra. Now, you can! Unified Identity allows you to connect to any OIDC and any SAML IdPs.
This is a big integration and will require help from your Customer Success team to coordinate. Please note that Unified ID integration cannot be done at the time of upgrade, and there may be a wait until resources are available.
Windows Server 2025 Compatibility
Starting in 2025.3, Flex is compatible with Windows Server 2025. This means any agencies looking to do any type of migration, Windows Server 2025 will now be supported. As a note, we are actively working on Red Hat 10 compatibility, but are currently compatible with Red Hat versions 8 and 9.
Report Printing Recorded in Sylog
Historically, in Flex, we have been storing reports, but they’ve been saved in a file on the server, rather than in sylog. Since most agencies are looking in sylog for everything, we updated that experience in 2025.3. Now, anytime you print a report from the reports menu or from the command line, it’s captured directly into sylog. This update is automatically enabled.
Go back to the top ↑
Flex CAD
ProQA Refinements
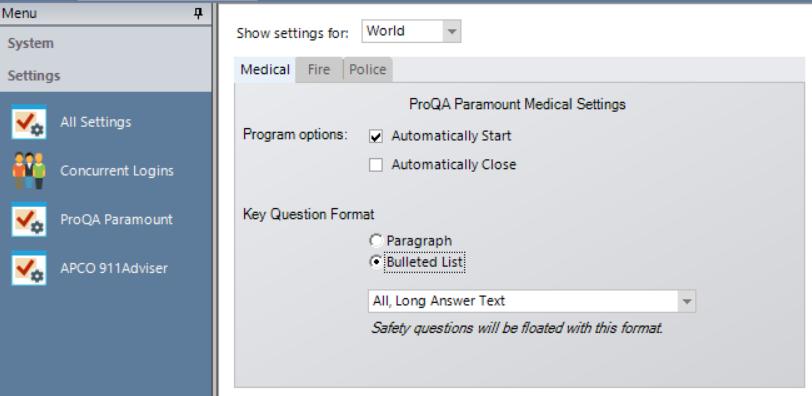
Over the past year we’ve been working closely with Priority Dispatch to make major enhancements to ProQA in Flex, many of which were released in 2025.1. After the work done this quarter, we’re further enhancing the experience in ProQA for Flex telecommunicators and first responders. This includes things such as improving display codes and suffixes, fixing inconsistent spacing in call comments, adding bullets to descriptions from the EIDS tool, and flagging urgent comments from ProQA as ‘urgent’ in Flex.
We’re excited to be able to push these updates back to 2025.1, helping Flex customers get a better understanding of the information coming from ProQA. There are no settings to enable these updates; they will happen automatically.
Go back to the top ↑
Flex GIS
Intersections on Streets Without House Numbers
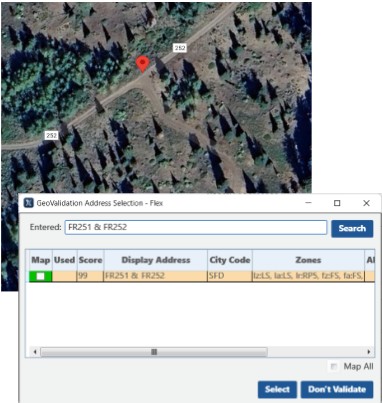
The GIS street data maintained by agencies or their GIS authorities does not always have a street range associated with every street segment. In the past, Flex has required users to add a street range to any segment that needed to be part of an intersection, making for a complicated and roundabout process. Starting in 2025.3, this requirement no longer applies, and intersections can be supported on streets without house numbers.
There are no settings required to enable this update. New ‘Location Code’ and ‘Address Type’ fields have been added to gbaddr to support this new functionality.
Flex CAD Map
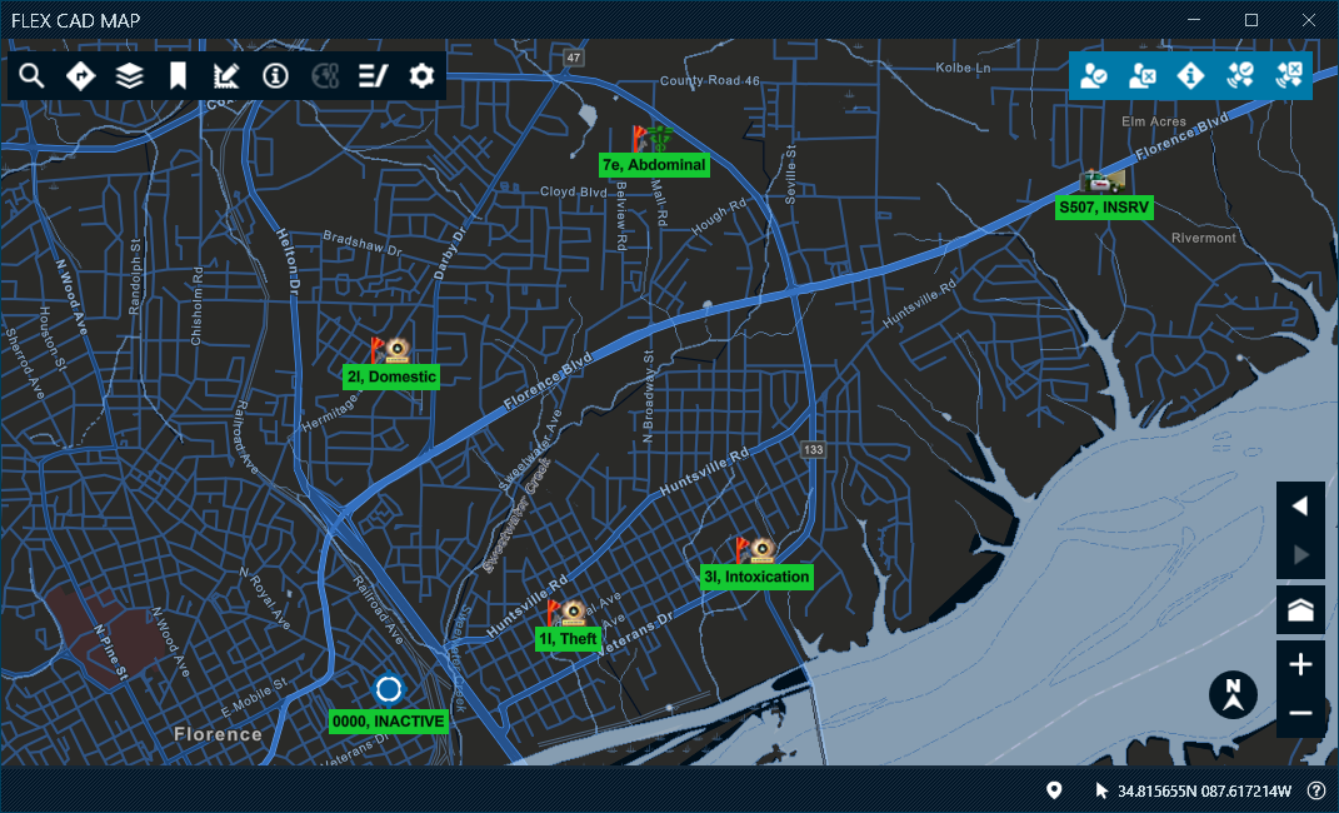
Big changes that have been in the works for years are coming to the Flex CAD Map starting in 2025.3! We have updated the map to use the latest ESRI mapping technology, just like the Mobile and Pin map, for a consistent experience throughout the mapping suite. The EagleView Map is also now available in CAD, keeping everything you need in one place.
Use the new Module.Mapping.flexCADMap setting to enable this functionality. If you do not enable the setting, Flex will continue to use the existing CAD map for now. We look forward to customer feedback as we continue work and enhance our mapping capabilities!
Additional Base Maps
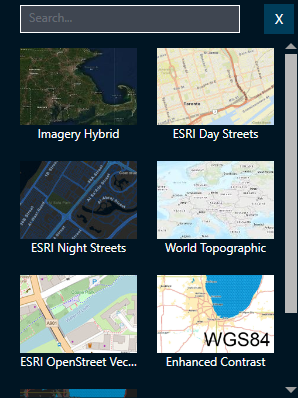
As part of our changes to the Flex CAD Map, additional base maps have been added to the CAD, Mobile, and Pin maps when using a Mobile Map Package (.mmpk). This is helpful for any map user who wants a larger selection of base maps, such as utilizing a high contrast map if you’re color blind. This will also enable Flex to display base maps from CommandCentral Admin. They are sorted by the user’s most recent base map selections for quick access.
There are no settings required for this update.
Go back to the top ↑
Flex Apps
Flex Scanner App now Available on Apple Devices
You’ve been asking, and we’ve delivered! The Flex Scanner App is now available on iOS devices! Earlier this month, we released the Flex Scanner App on the Apple App Store, where agencies are able to download it at no cost.
The iOS version has feature parity with the Android version, so Evidence & Jail scanning features are on the same app; not only that, but the same system privileges for Android work for iOS as well. Don’t forget, you can now use the device’s camera to take pictures of the barcode; a purpose-built barcode scanner is not required for either the iOS or Android versions of the Flex Scanner App.
Scanner 3.2.0
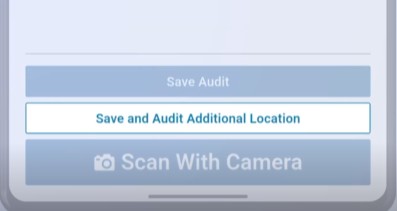
Starting in version 3.2.0, we’ve added the ability to audit multiple evidence locations in one scan. The app also includes the ability to hide inactive locations, making it easier for users to find the right location, while still being able to make them appear again if needed.
On the Jail side of the app, users now have a redesigned Keep Separate Notices section, including new functionality that lists the violation. It also has an improved background Code Table reloading, which is especially important in ‘keep separate’ instances where you need your data up to date. Finally, we have clearer error messaging to help users understand what the problem is and what to do to fix it.
All of these new features are activated by default based on data in the system.
Scanner 3.3.0
In version 3.3.0, we’ve integrated with Unified Identity, bringing that seamless login experience to the Scanner app. On the Evidence Scanner side of the app, there’s a new feature that will search by incident number, automatically showing a list of all evidence associated with that number and where they are located.
There is also an updated audit report on the app and barcode scanner web app. As part of this, when users scan a location, they will see a list of all items that should be in that location. Finally, there’s now the ability to set Favorite Evidence Locations, Reasons, and Transaction Types. This will help users who often send evidence to the same location or person.
All of these new features are activated by default based on data in the system.
Touch 1.21.0 / 1.22.0
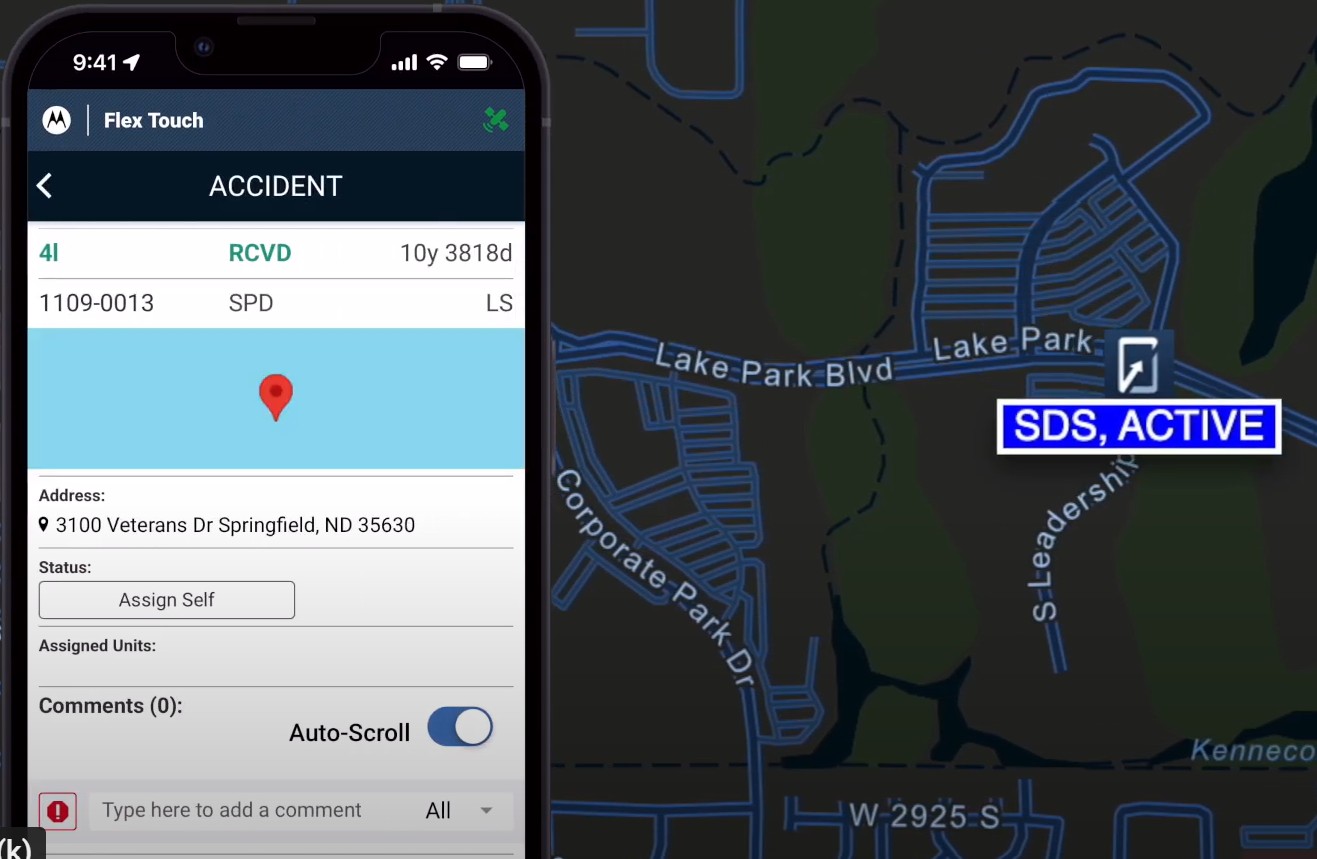
We’ve combined these two versions to bring about some exciting new enhancements to Flex Touch users. Now, officers can create urgent CAD comments from the app, something that was previously only available in the CAD or Mobile experience. Users can now search for names by name number, bringing you right to the specific user you’re looking for. And finally, users can now use their Touch device as an AVL locator, similar to how they would with a mobile device. When it shows up on the map, it will show with a Touch icon to indicate that it’s a Touch device.
Super admins will be able to force the AVL location to be turned on or leave the decision to individual users on whether they want to turn it on themselves. It uses the same settings as the Flex Mobile app.
Touch 1.23
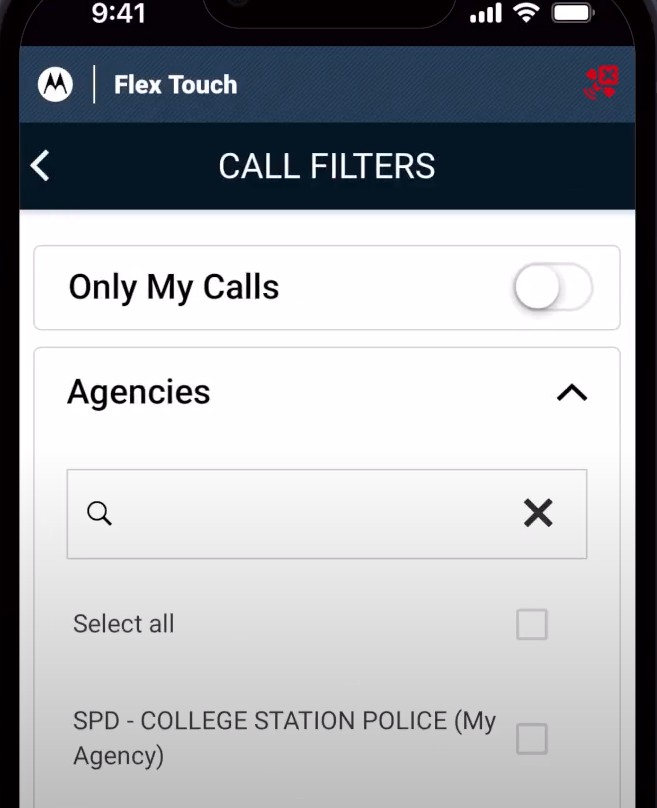
We’re excited to announce a commonly requested feature in Touch 1.23: filtering CAD calls based on related agencies! This will be particularly useful when responding to calls in neighboring jurisdictions. In this release, we’re also including improved login error messaging for quicker understanding, as well as a Touch client session timeout to better meet CJIS requirements.
As a reminder, we have discontinued the Flex Web Client (or the Touch Web Client), and what appears if you try to sign into Touch2 on a web browser. For similar functionality and a better user experience, talk to your Motorola Solutions representative about the CAD Web Client.
Go back to the top ↑
Flex Jail
Visitation
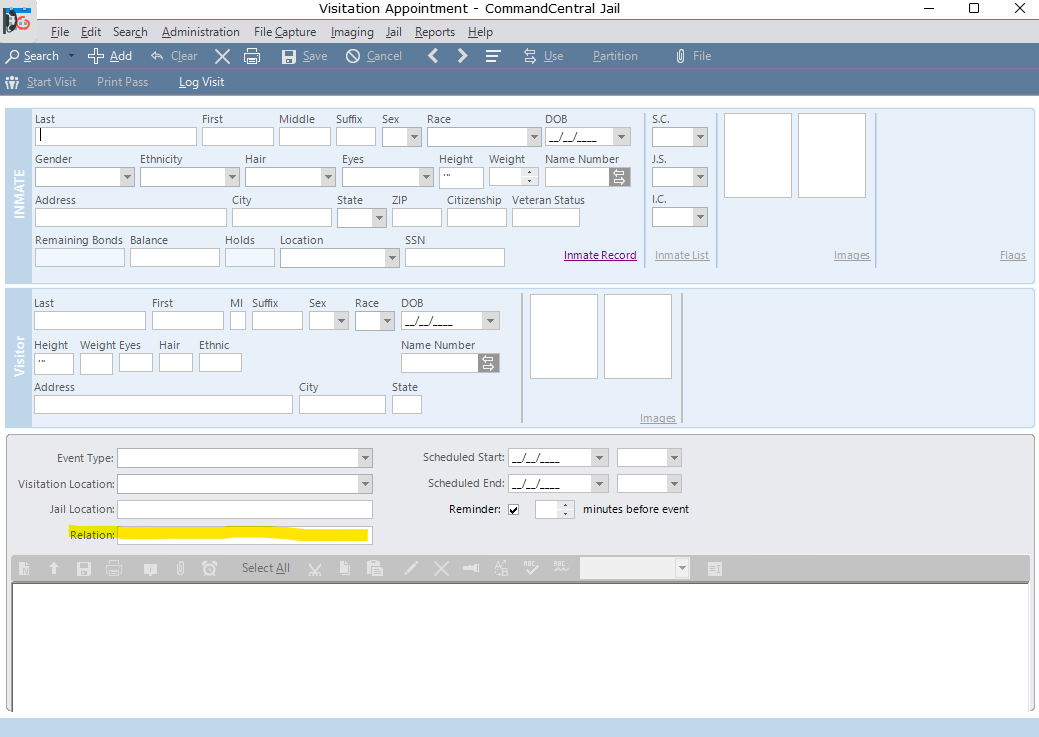
In this newest release of Jail, we’ve added a Relationship field to the visitation appointment screen. This field always existed, but having it in an easier-to-see spot right within the visitation screen should improve the experience for all correction officers. This field will sync with the previous field location as well, making sure everyone is working off the same data. The visitation relationship will also appear when you print reports.
There is no setting needed for this update.
Jail Events
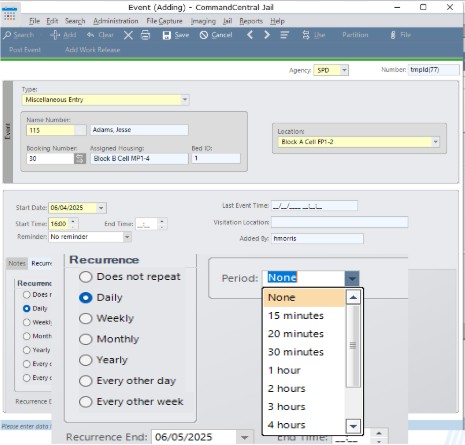
We’re continuing our work on Jail Events in this latest release. Now, in 2025.3, we’ve greatly improved the Recurrence functionality by adding the ability to choose a time period. Previously, if you wanted something to recur every hour or every 30 minutes, users had to build multiple events throughout the day for one event type. Now, users can select how often they want it to occur (such as every 15 minutes, every 20 minutes, every 2 hours, etc.) from a drop-down menu.
There is no setting required for this update.
Go back to the top ↑
Flex IBR
Offense Bonds
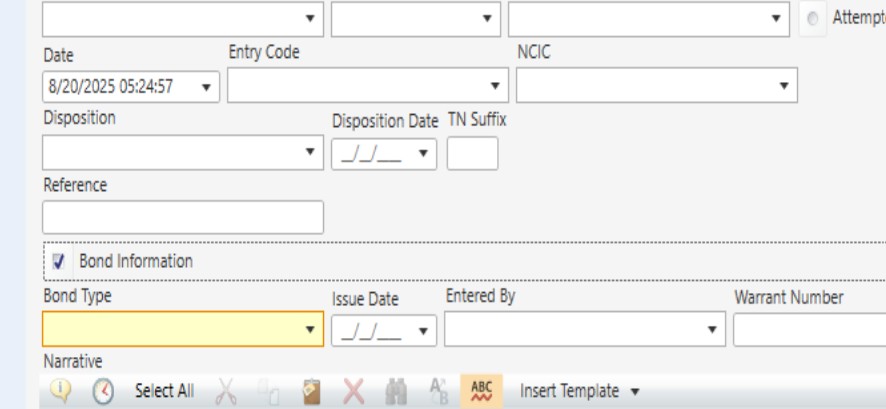
In 2025.3, we’re continuing to improve the experience around bonds and warrant fields on the Mobile arrest form. We’ve now included an optional checkbox for patrol officers to select, which will determine whether or not the bond and warrant fields appear.
There are no settings for this feature; it is turned on by default. More updates will be coming in future releases.
Go back to the top ↑
June, 2025
Flex Platform | Flex CAD | Flex GIS | Flex Apps | Flex Records
Flex Platform
New Flex Installer and Launcher

Flex 2025.2 brings big changes to both the Flex client installer and launcher. First off, there’s a brand new installer that uses an updated framework, with fewer dependencies. Not to mention a brighter look and updated branding. This new installer will automatically install any .NET Core updates, saving hours of manually updating hundreds of computers.
The new launcher, also with an updated look, automatically deploys and installs when your clients hit a Flex 2025.2 and above server. It will also install any .NET 8 updates. The best part? After the first install, it will not require administrator action moving forward! That means patches will not require your IT personnel to log in to each computer. This will be a huge help to IT personnel, making it much easier to update all clients. You can even check out the Flex documentation portal for information on how to conduct silent installs.
Go back to the top ↑
Flex CAD
“How Received” and “Priority” Defaults
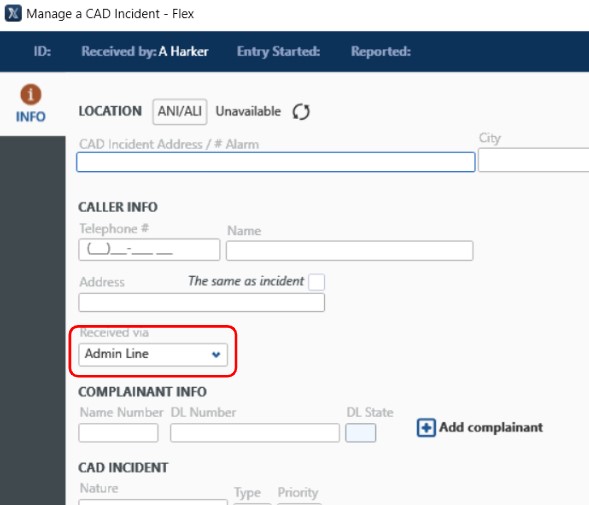
In 2025.2, users can now set default values for the “How Received” and “Priority” fields on the CAD Incident screen. For example, if an incident’s Priority field is left blank for a nature code, it will automatically pull this new default value. This will save valuable time by pre-filling data. One note of caution is if your agency requires call takers to manually set Priority. You should avoid using this default to ensure the system prompts them to enter that in.
In the Module.CAD.Calltaking.DefaultHowReceived setting, you can either leave it blank or add a value from tbhowrc. If it is left blank, the system will continue to use “T” for telephone. For Priority, you can either leave it blank or add a value from 0-9. These new settings do not impact E911 or other interfaces that set this value.
Level Description and Mutual Aid Contact in Response Plans
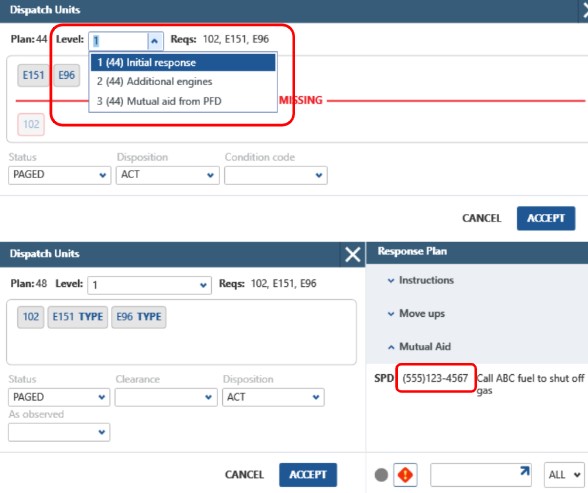
This newest update improves dispatching Response Plans. Previously, the new Incident screen lacked descriptions for alarm levels when selecting from the dropdown. Now, these descriptions have been restored, helping users understand what each alarm level represents. Additionally, the Mutual Aid contact information field, which was missing in the new Incident screen, has been brought back. This field often contains phone numbers for contacting neighboring agencies for assistance.
There are no settings to activate these fields; they will be automatically included in Response Plans starting in 2025.2.
Web Links in Special Instructions
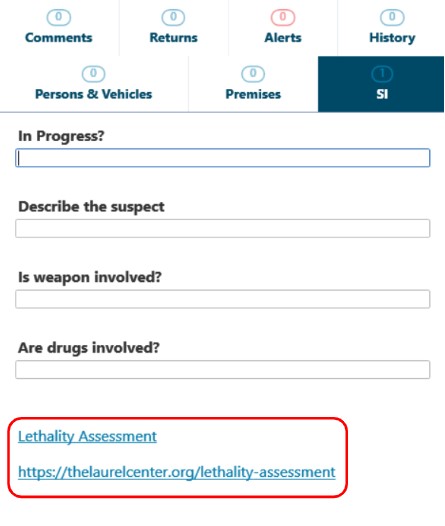
We’re all used to utilizing web links on various platforms that we interact with throughout our day. Now, we’ve enabled hyperlinks in the Special Instructions area in CAD. This will be particularly helpful for agencies with SOPs and other documents that are referenced in the Special Instructions section. There are two different ways to show the link: either with the HTML href tag (so that the description text is the link) or by simply pasting the HTML link directly in the area.
There are no settings to activate this functionality; it will be automatically enabled in 2025.2.
Go back to the top ↑
Flex GIS
WMTS Map Services Support
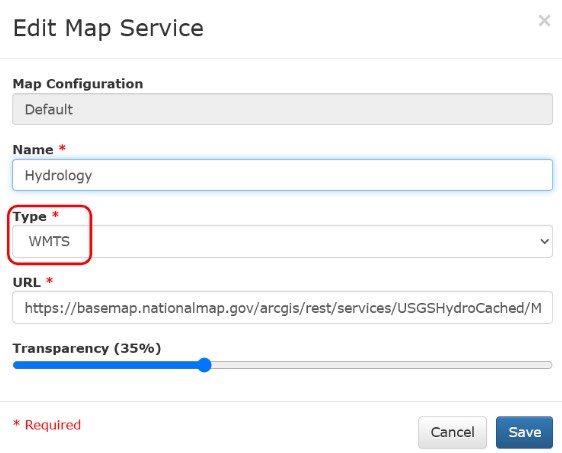
In 2025.2, Web Map Tile Services (or WMTS) are now supported and can be added to Flex map configurations. WMTS is an OGC standard for serving digital maps using pre-rendered tiles. These layers can then be displayed in CAD, Mobile and Pin Mapping, allowing agencies to incorporate these map services that are published by public providers of GIS data.
There are no settings for this feature. All you need to do is select the new WMTS type in map configurations.
Pin Mapping Update
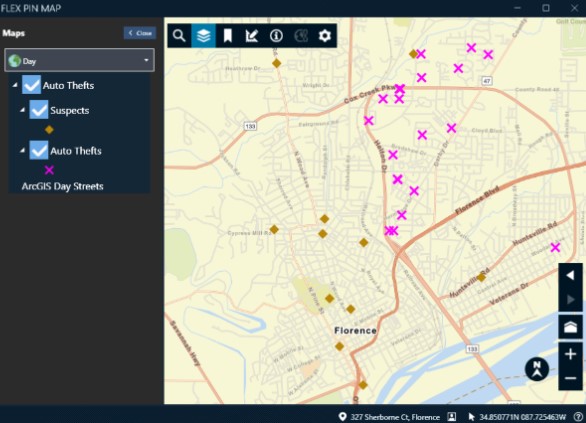
We have updated our Pin Mapping in Flex! Starting in 2025.2, Pin Mapping will make use of the same mapping configurations that are used for the Mobile map and the CAD map, keeping a consistent and intuitive user experience. Users can still search more than 50 tables in Flex that have location information and map that data, but now it will show up on one of the standard map configurations. This continues to be helpful for investigations, command staff or anyone interested in the spatial relationship between Flex data, to better understand where certain activity is taking place.
If your agency is using the classic Pin Map, then you need to set Module.mapping.flexmap to True in order to enable the updated Pin Map. Contact your Account Representative if your agency is interested in more details.
Go back to the top ↑
Flex Apps
Active URL Links
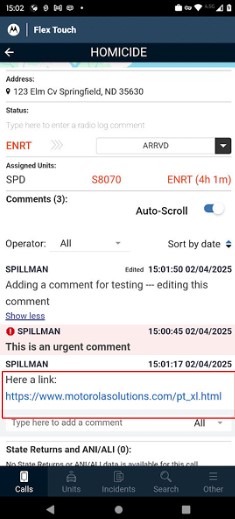
Is your agency a Smart911 user? Or do you simply wish that you could better utilize links added to call comments within Flex Touch? Then this latest update is for you. Beginning in version 1.20.0, Flex Touch will recognize URLs in the Call Comments section and open them via the device’s default web browser. No more cutting and pasting URLs into a new browser. Touch users can quickly click on links that might get added from various Flex integrations, including Smart911, which automatically places URLs in CAD Comments.
There are no settings to activate this functionality; it will be automatically enabled in Touch 1.20.0.
Discipline Specific Comments

We’re bringing the same innovation that you know and love for Discipline Specific Comments in Flex Mobile to Flex Touch. Starting in 1.20.0, dispatchers can now mark comments that they only want to be seen by specific disciplines. This is particularly helpful in keeping CJIS data within comments targeted to users who have the right permissions to view that information.
If your agency already has Discipline Specific Comments turned on and configured, this will automatically start working in the newest version of Touch and follow the existing rules you have set. If not, you will need to enable Module.CAD.CallTaking.EnableDisciplineSpecificComments and configure Module.CAD.CallTaking.DefineMaxCommentVisibility to start using this feature.
Evidence Scanner Improvements
Thanks to many of our customers testing the new Evidence Scanner and providing feedback, we’ve made a number of user experience improvements to the application. First, the Evidence Audit and Movement screens have been enhanced to enable a clickable “Choose Evidence Location” button. We have also updated the login process so that it skips server screens when a server is already configured (both for the Jail and Evidence modules). Finally, we found that many users wanted to be able to scan items before having to select Transaction Type and Reason Code. So, labels can now be scanned at any point once a user is on that screen, allowing users to follow a workflow that best fits their processes.
For those users who missed the ability to complete Evidence audits of multiple locations at the same time, as promised, we brought that feature back!
There are no settings to activate this functionality; it will be automatically enabled in 3.2.0.
Go back to the top ↑
Flex Records
Printing Reports From Mobile

We’ve got a big win for Mobile users this quarter. Now, you can easily print reports directly from Mobile without having to switch to the full Flex Desktop application. No more having to use the Summary tab to print reports! Printing can be done via the Mobile Law Incident Form or Mobile Law Incident View, making printing quick and easy regardless of where you are.
This feature is turned on by default, but you can turn it off in Module.FR.Reports.IsPrintReportsButtonOn. Admins can also define which lwmain reports appear on the dropdown by going to Module.FR.Reports.DefaultIncidentReports and adding the name of the lwmain report they wish to list. A description can be set by adding a – ReportDescription after the report name. Make sure your Mobile users have the “report” sypriv.
Long-term Call ID and External CAD ID in Mobile
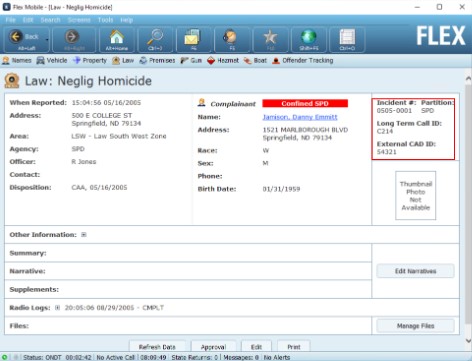
With this latest enhancement, we’re making it easier for Flex users to cross-reference CAD information while in Mobile. Starting in 2025.2, the Long-Term Call ID and External CAD IDs will be visible in the top right corner on Mobile Law screens if they exist for the record. These fields were recently made visible on the Mobile Law Incident form when creating or editing an incident. Now, this data will also be accessible when viewing a record, making it easier to verify information without leaving the screen.
There are no settings for this functionality; if the data exists, it will automatically appear on the screen.
Dissemination Screen Updates
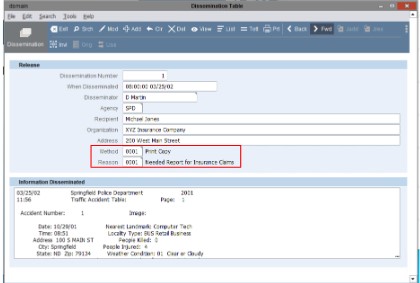
In 2025.2, we made a number of minor updates to the Dissemination Screen, which also came directly from customer feedback and usability testing. Now, the Dissemination Method and Dissemination Reason fields have been changed to code tables, which is intended to improve organization and keep everything in a standard format. The Organization, Dissemination Method Description and Recipient fields have also been expanded to be much larger than they were previously, allowing for a better user experience. And finally, in the new Flex UI, users can now add the CAD Call Number and Related Incident.
There are no settings needed to activate these changes. Existing entries in Method were added to dsmeth and existing entries in Reason were added to dsreain.
Go back to the top ↑
February, 2025
Flex Platform | Flex CAD | Flex GIS | Flex Apps | Flex Records | Flex Jail | Flex IBR
Flex Platform
System Logging Turned on by Default
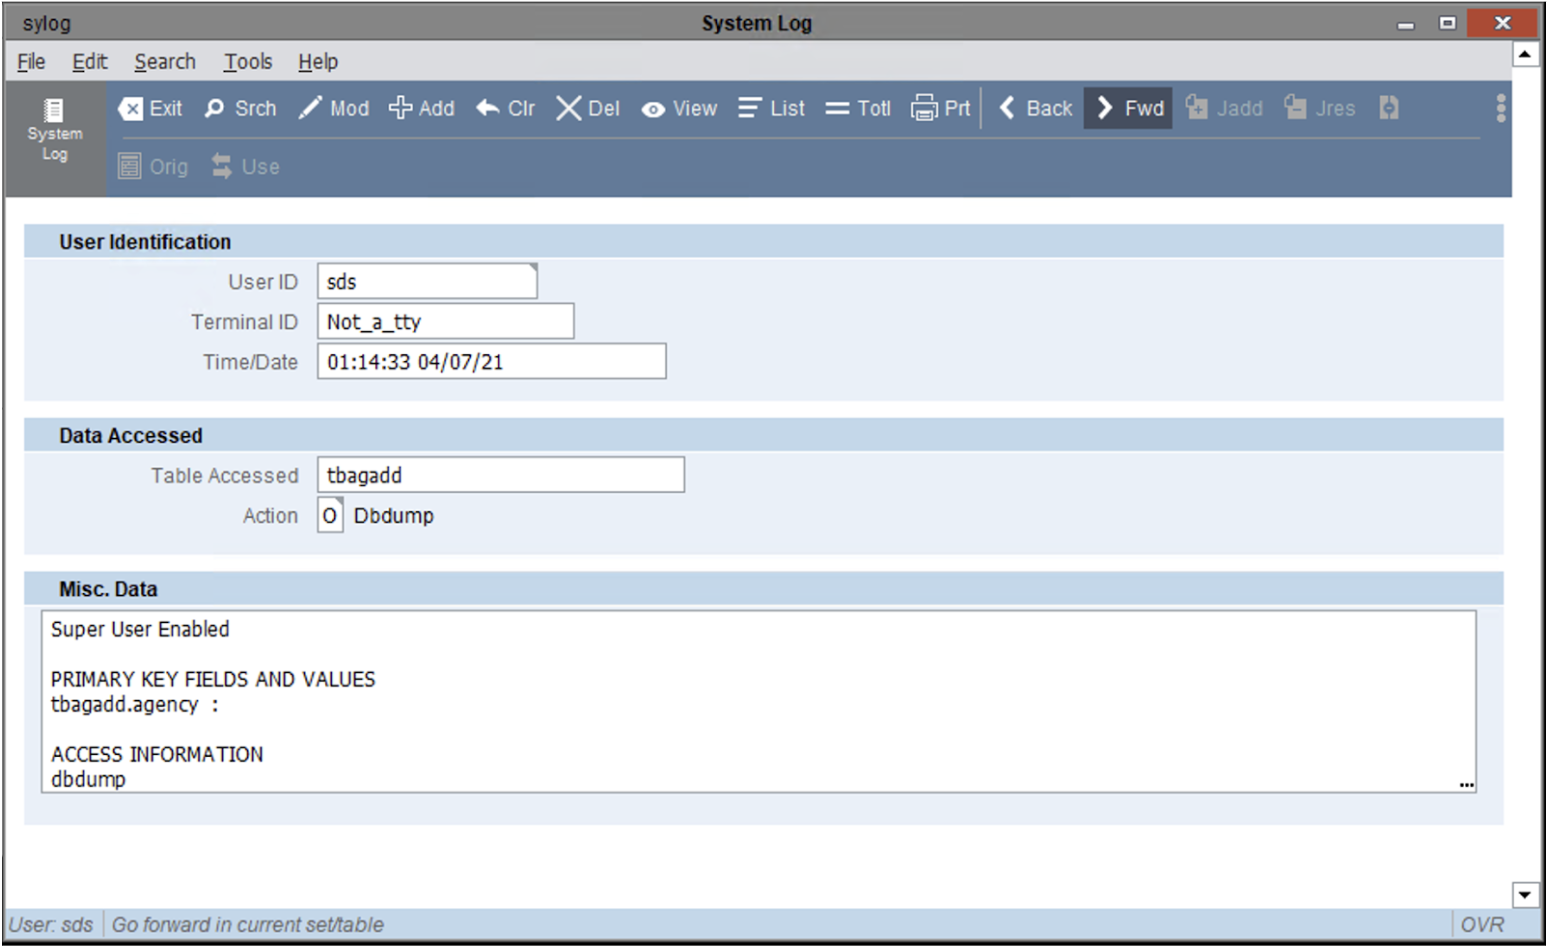
As you may know, in order to start logging on to the Flex system, you have to set the syparams, logmodes and logtables to specific criteria. The CJIS Security Policy requires that all activities on a system like Flex be logged. However, some agencies do not turn on full logging capabilities and do not realize it until it’s too late. That’s why we’ve hard-coded the logging of all tables and all actions into the Flex System Log screen (sylog) beginning with 2025.1. To help SAAs not get confused, we have removed the logmodes and logtables syparams table.
No settings are required; this update happens automatically.
Go back to the top ↑
Flex CAD
Smart911 Integration
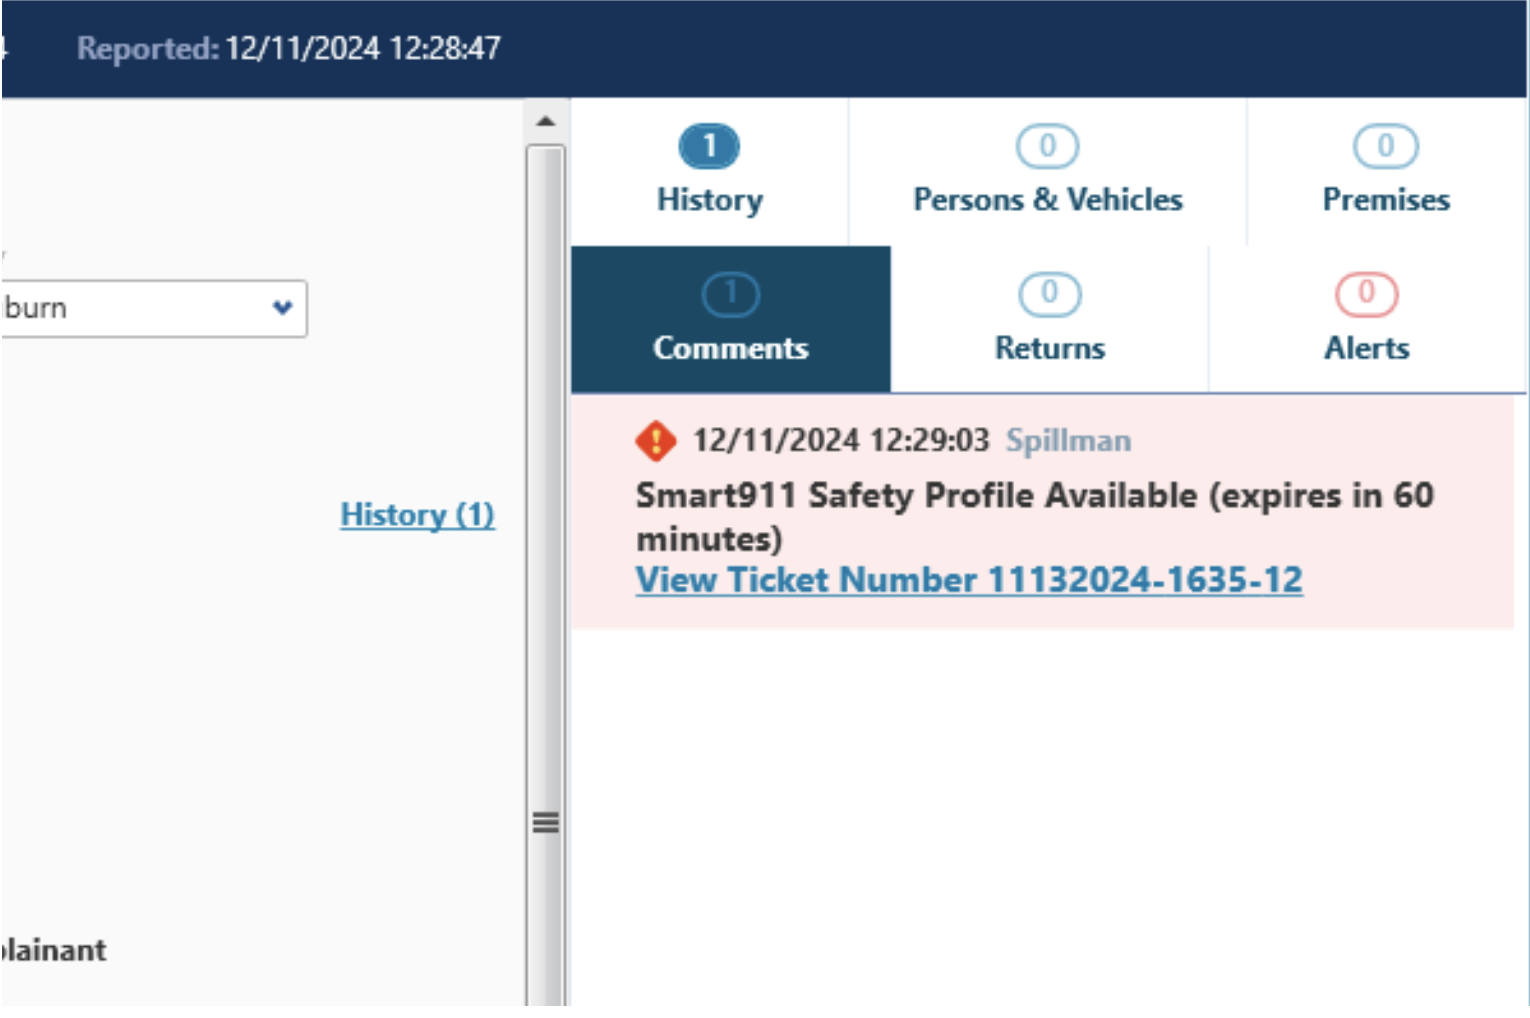
One of our main focuses is to integrate Flex with more portions of the Motorola Solutions ecosystem. That’s why we are excited to announce the newest update to that mix: the Flex integration with Rave Smart911! This provides telecommunications and first responders with access to additional citizen information to aid in emergency response – such as members of household, medical information, pets, etc. When a 9-1-1 call is entered in Flex CAD, the number is checked against Smart911. If a matching profile exists, an Urgent comment with a link to the information in the Rave portal is added to the call.
This integration requires a Rave Smart911 CPE server and the CAD Incident Screen with new call comments enabled for both CAD and Mobile. See the Flex release notes for more settings information.
Automatically Search Names in Comments
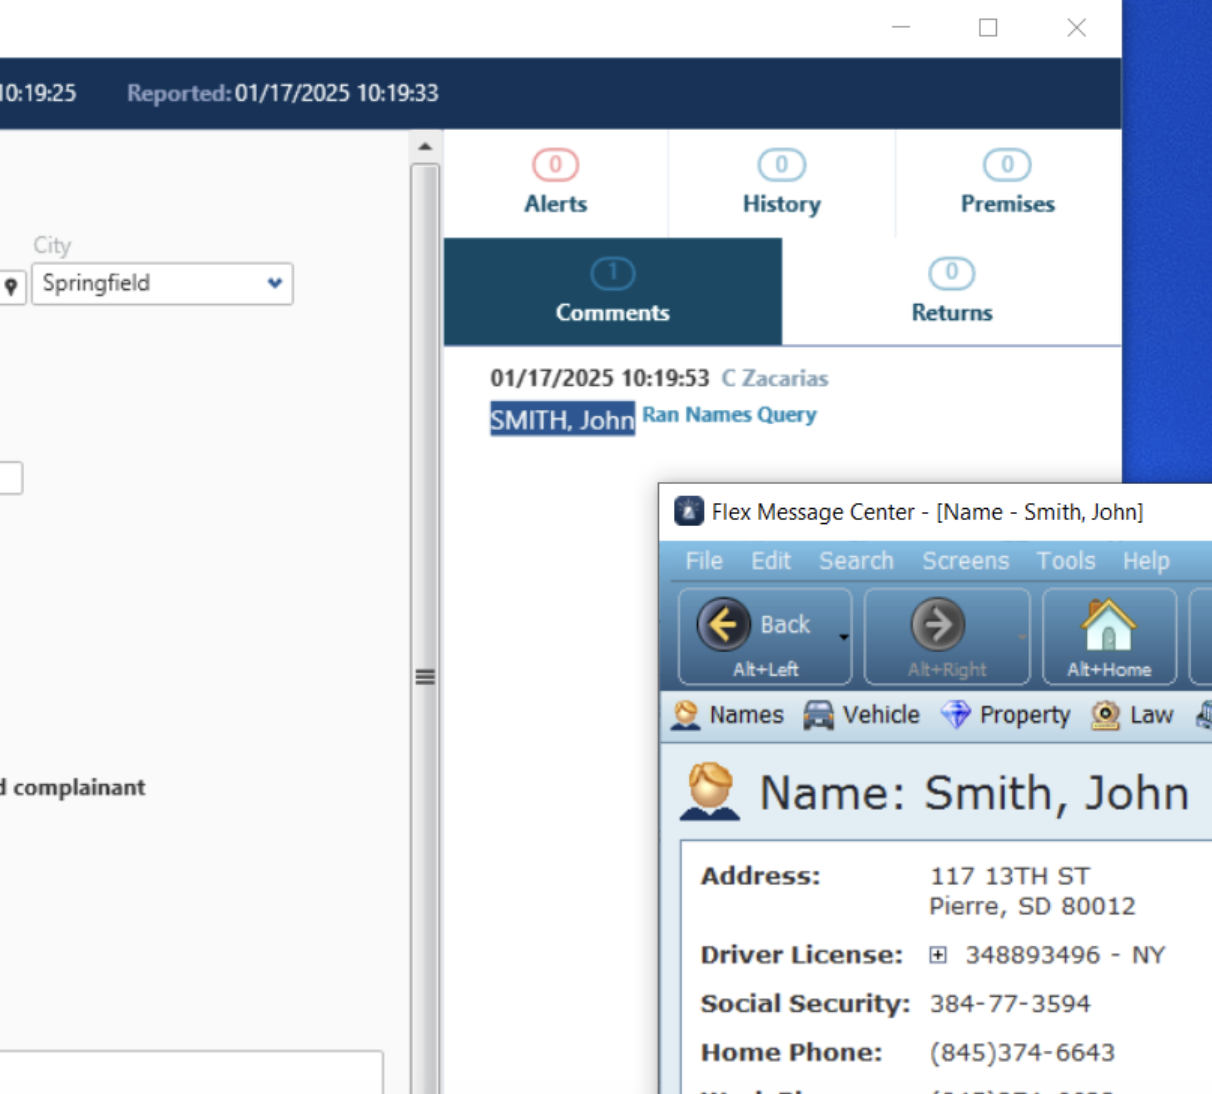
In 2024.4, we announced the new ability to search names in CAD comments. In 2025.1, we’re taking this one step further by allowing AI logic to read those comments, recognize names, and automatically run the query without the user manually highlighting the name and running a query.
Using the same setting, you can now set “YesWithAutoSearch” in Module.CAD.Calltaking.RunNamesFromComments. Since this functionality should only run on dispatch stations, the system will also check for a valid cdttys entry containing the workstation ID/IP address of the CAD computer.
ProQA Updates
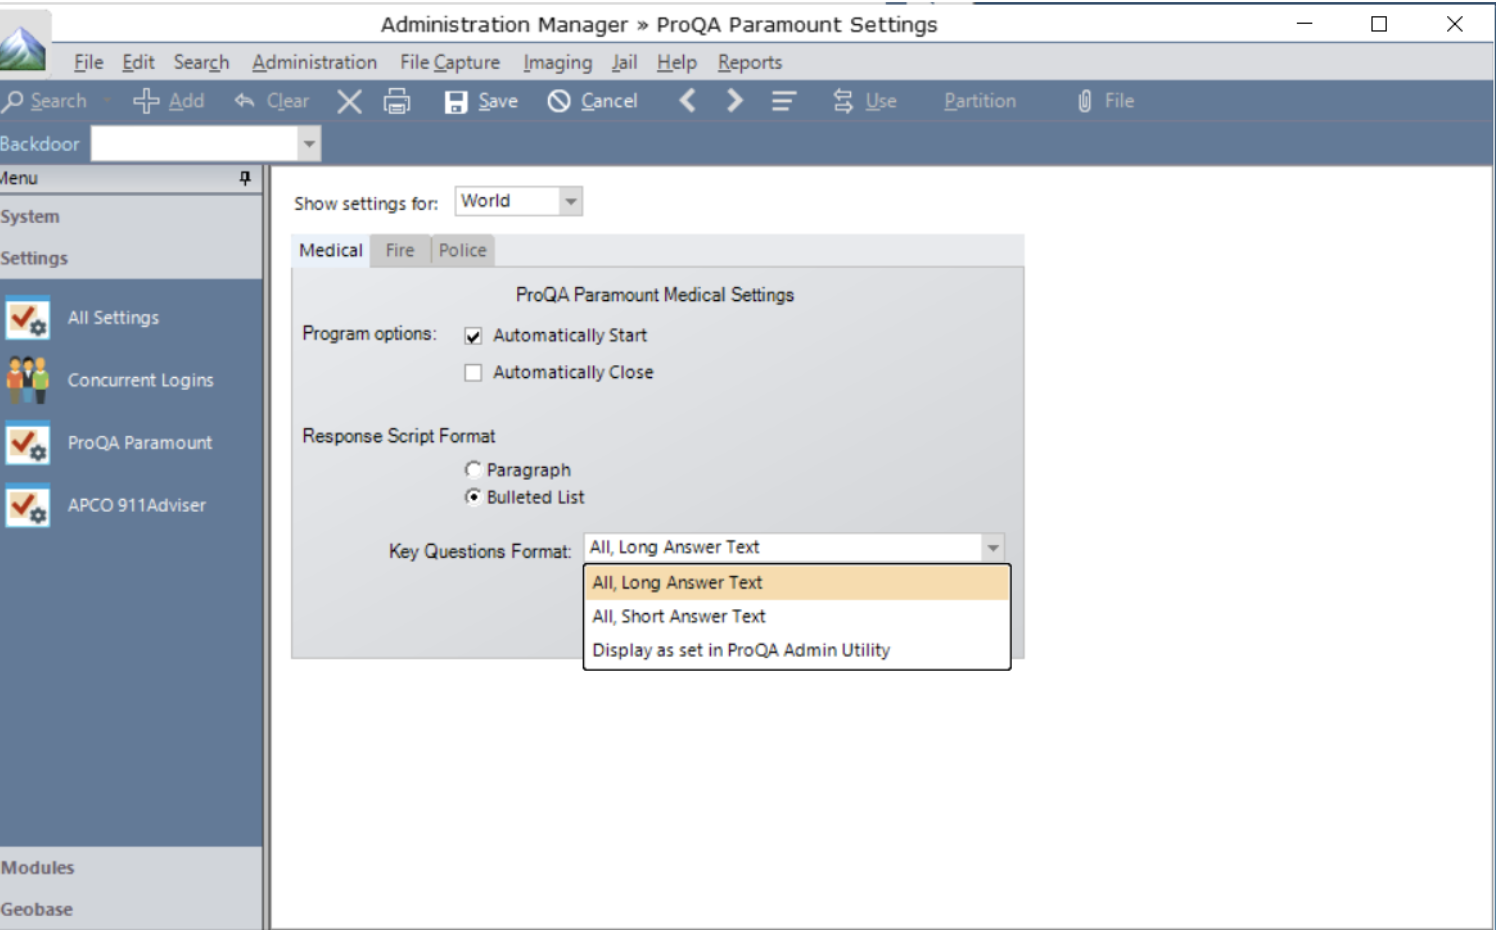
ProQA has been busy making updates to its software. To that end, we’ve enhanced Flex CAD to work with the following description essentials: bicycle, fire boat, water craft, clothing, equipment/supplies, outdoor experience and lost person. When a dispatcher adds information for these items, that information comes over and is displayed in the call comments. Within ProQA’s Admin Utility, users can now specify how they want items displayed in the CAD call comments. To simplify this within Flex, we’ve now added a new “Display as set in ProQA Admin Utility” Key Questions format.
We strongly encourage agencies that use ProQA to set up how the Key Questions will appear in CAD within the ProQA Admin Utility in order to take full advantage of this new functionality.
Go back to the top ↑
Flex GIS
“After” Delay for Automatic Status Updates
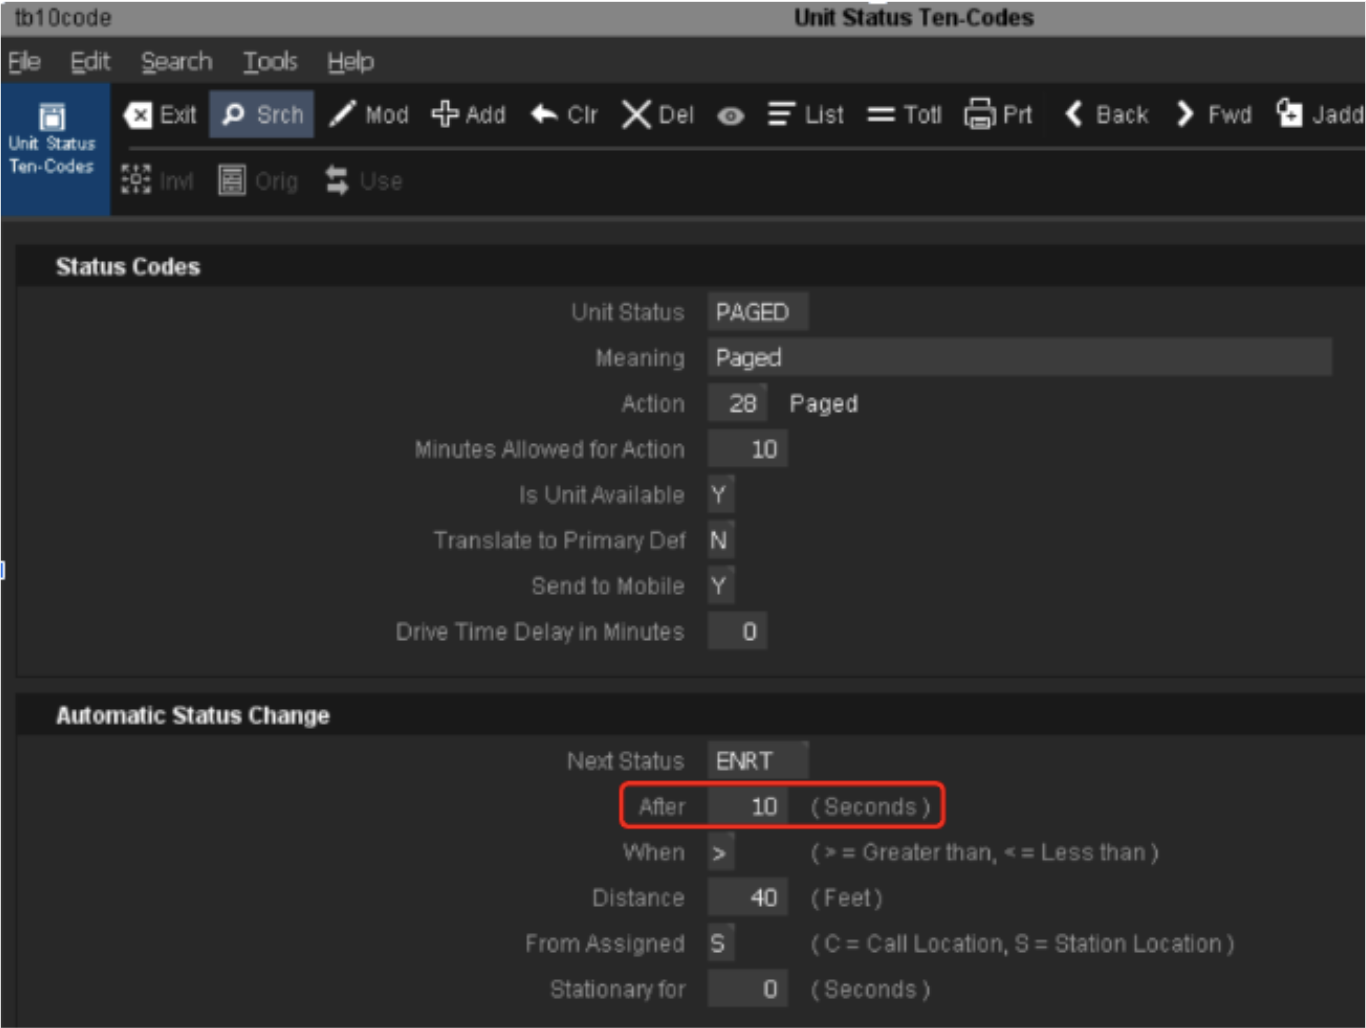
Last year, we released the Automatic Status Update feature. This year, we’re enhancing the feature to allow time for an interface to “see” a triggering status and time for personnel to see the status changes. With 2025.1, you’ll see an “After” field in the tb10code table for automatic status updates. A value in this field (in seconds) prevents a unit from switching immediately from one status to another, allowing time for interfaces or people to see the original status. This should help alleviate worries about anything being broken.
There are no settings for this feature; it will be included automatically. The default value for the new field is zero.
Go back to the top ↑
Flex Apps
New Flex Scanner App

We’re excited to introduce our new Flex Scanner App, which combines the Jail Barcode Scanner and the Physical Evidence Barcode Scanner Android apps into one improved app! By combining these two apps, we’re reducing development time for new features and making it easier on your IT department. This app includes the highly requested feature of enabling the device camera for barcode scanning in both the Jail Scanner and the Evidence Scanner. Additionally, evidence locations are now sorted alphabetically and only display the agency’s locations.
You can download this new app, at no charge, from the Google Play store by searching “Flex Scanner” or clicking this link. We’ll be disabling the current Flex Jail Scanner and Flex Evidence Scanner apps on March 31, 2025, so please download the new Flex Scanner app today!
AVL Location of Touch Devices
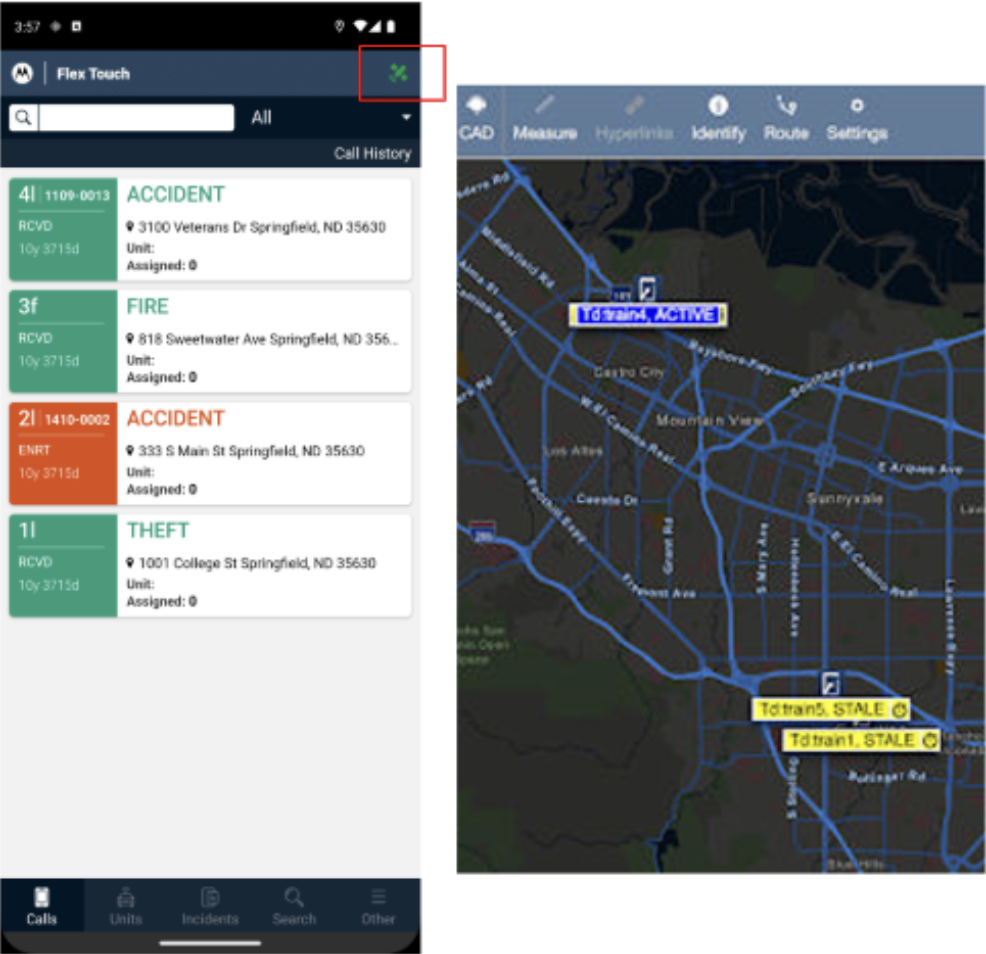
Starting in March of 2025, via an update to the Touch app, you will be able to display the AVL location of your Touch devices on all of the Flex maps. This means that for the many Fire and EMS agencies that use Touch, their location can now be seen by dispatchers and other first responders. This integrates with AVL manager and can be displayed in CommandCentral Aware as well.
Starting in 2025.2, admins will be able to force the AVL on, on individual devices using system.client.touch.avldefaults, which will be available at the user, agency, group and world level. Device GPS must be enabled via the device OS. iOS and Android will still have system-generated reminders. There is no way for the Flex software to override that, unless your agency is using a form of mobile device management.
Go back to the top ↑
Flex Records
New Flex Records UI Beta
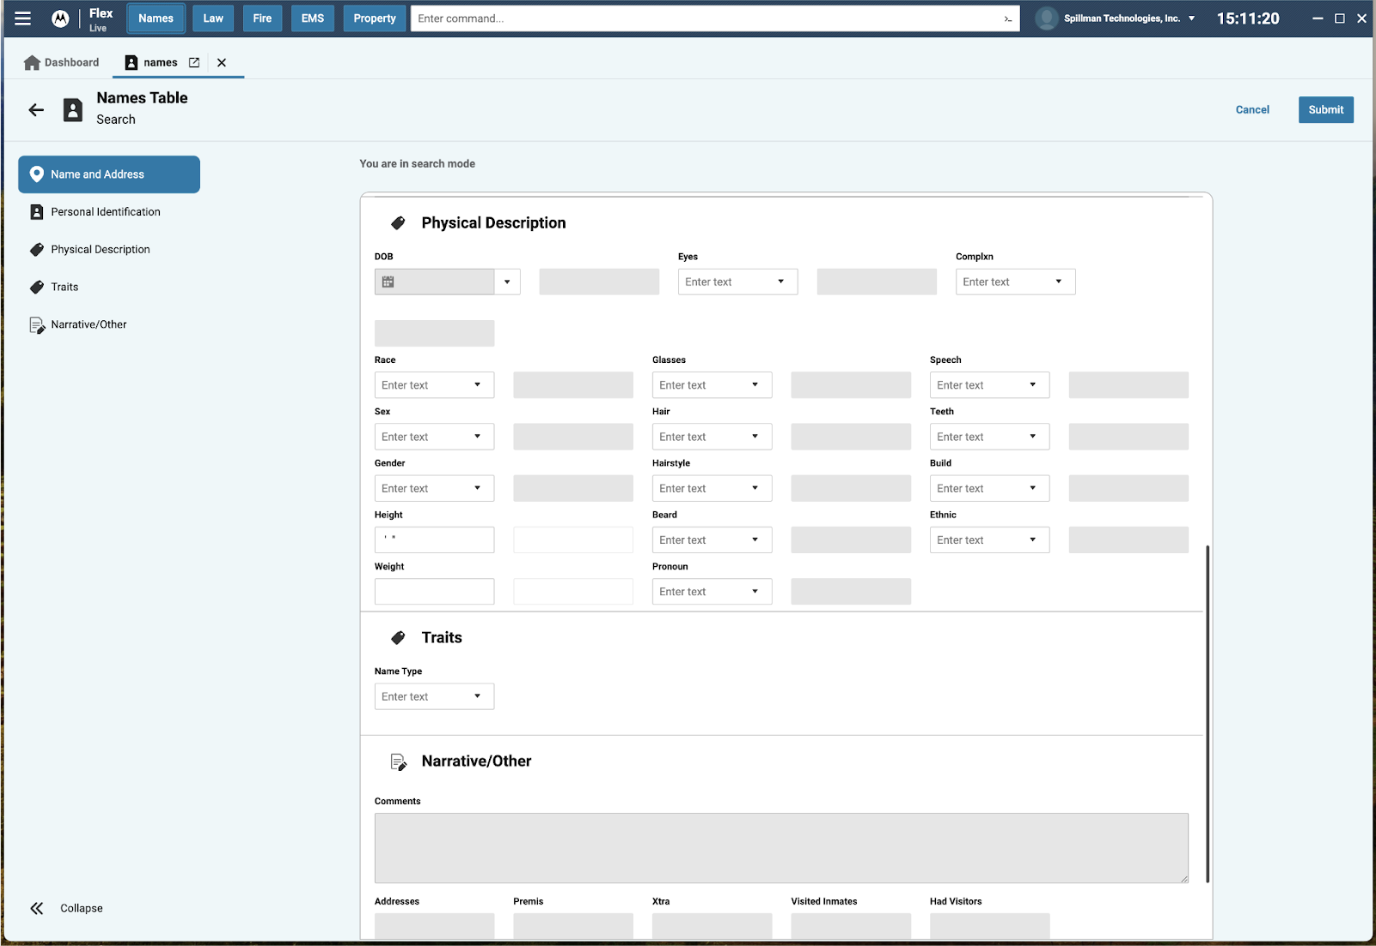
Of course, one of the biggest things we have been working on in Flex Records is the new UI. Now, with the 2025.1 release, the Beta is finally here for all Flex users! Please note that this is not intended to be a full replacement for the Flex Desktop yet; new functionality will be added with every release. However, we invite any agency using 2025.1 to start using it!
One of the benefits of the new UI is its seamless connection with other cloud products, such as Multi-Agency Search (the new InSight-like product) and CommandCentral Evidence. Users can click on those icons and utilize that functionality without ever leaving Flex. Between its sleek design, tabular layout and new dashboard, many features within the new UI will make our customers’ lives easier and more efficient.
Veteran and Citizenship Status Fields
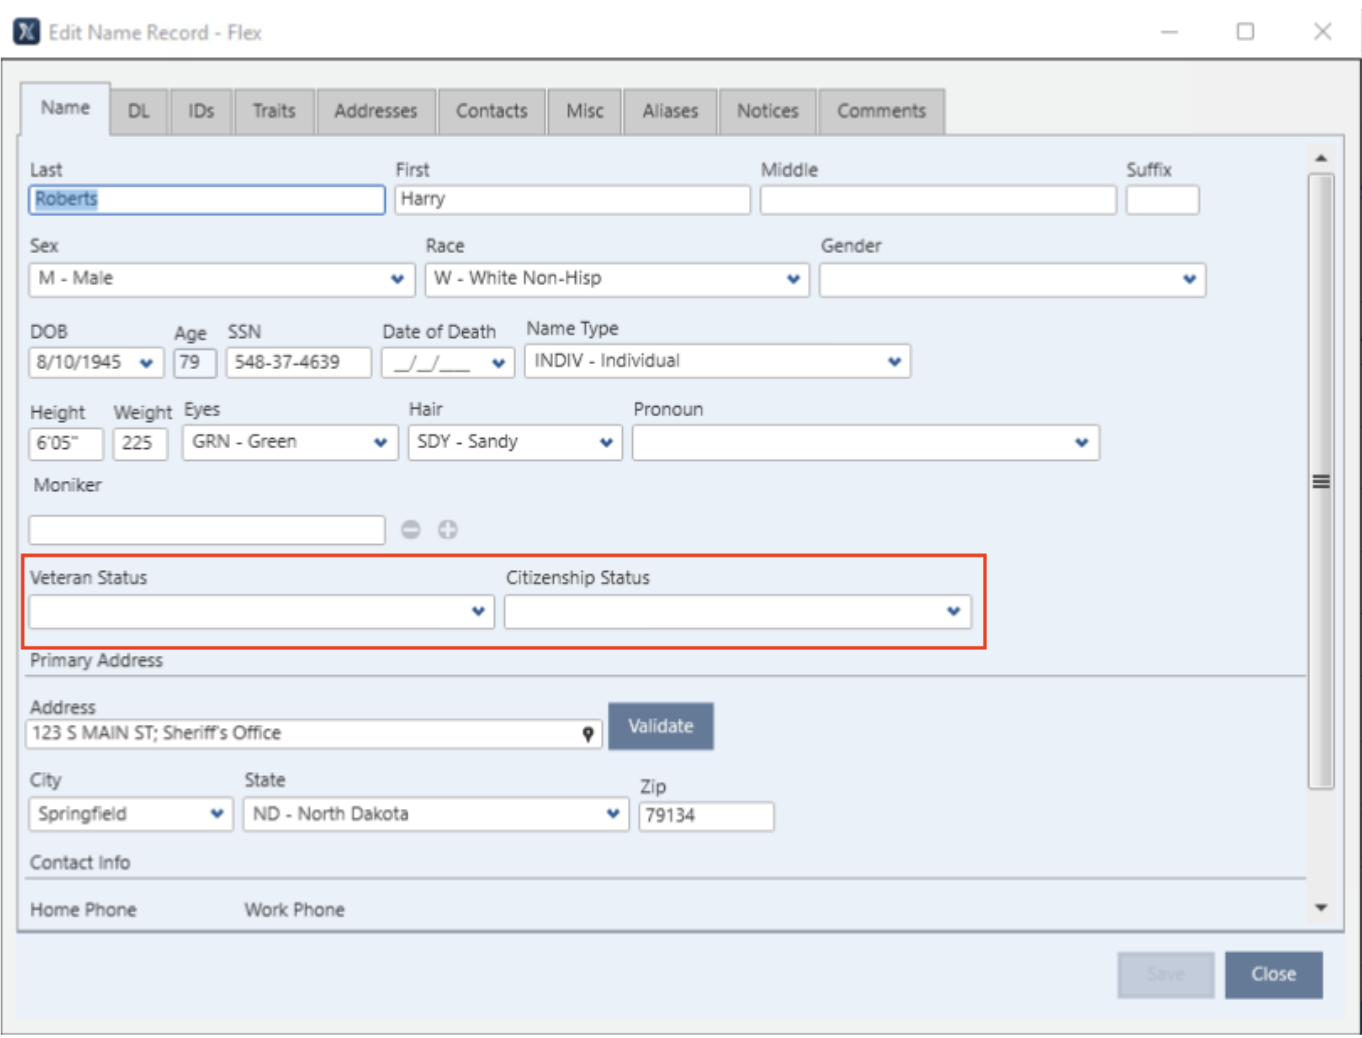
In 2025.1, we also added Veteran Status and Citizenship Status fields on the names table in the new UI and Mobile Names screens. This is another highly requested feature, especially for agencies near military bases or agencies that operate a jail. As you may know, there is already a “Citizenship” field in Flex, which is primarily used to show which country the person is a citizen of. This new “Citizenship Status” field allows users to indicate their status, such as US Citizen, Non-Resident, Green Card Holder, etc. These new fields can also be found on the Flex Jail inmate card.
Since this is a code table, each agency can use this field in a way that is best suited for their processes. The code tables tbvstat and tbcstat must be filled in by the agency.
Evidence Custody Update Alerts
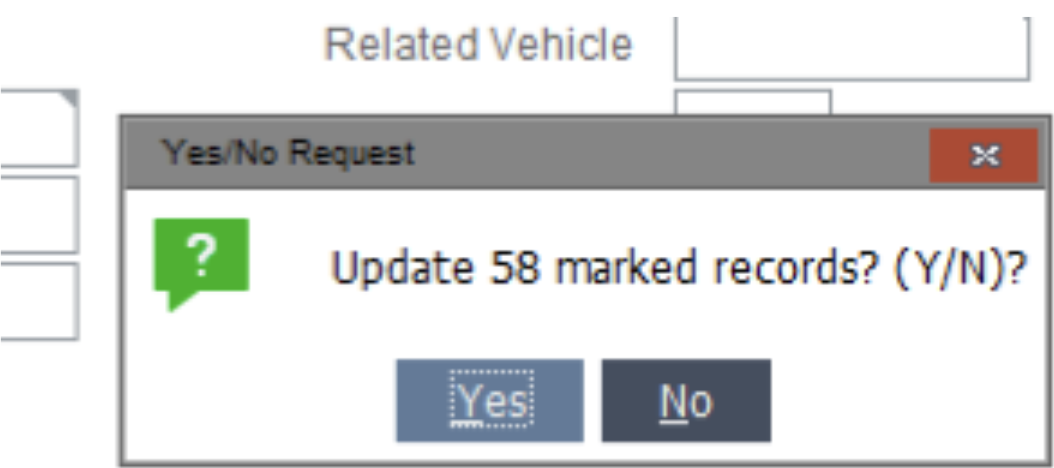
We’ve had a number of agencies accidentally modify hundreds of evidence records without ever meaning to. That’s why we’ve introduced this simple new feature that will bring up a confirmation message any time there are changes made to evidence custody from a list. Users will have to click “Yes” or “No” in order to proceed, confirming that they understand that they are modifying multiple records at a time.
Although there are no settings needed to turn this on – it’s turned on by default – we are asking you, our Flex customers, for feedback: What is the acceptable number of record changes to prompt this message? Currently, this message appears any time there are two or more records being changed. Is that the right cadence? Let us know in the comments!
Go back to the top ↑
Flex Jail
Public Inmate Search in CityProtect
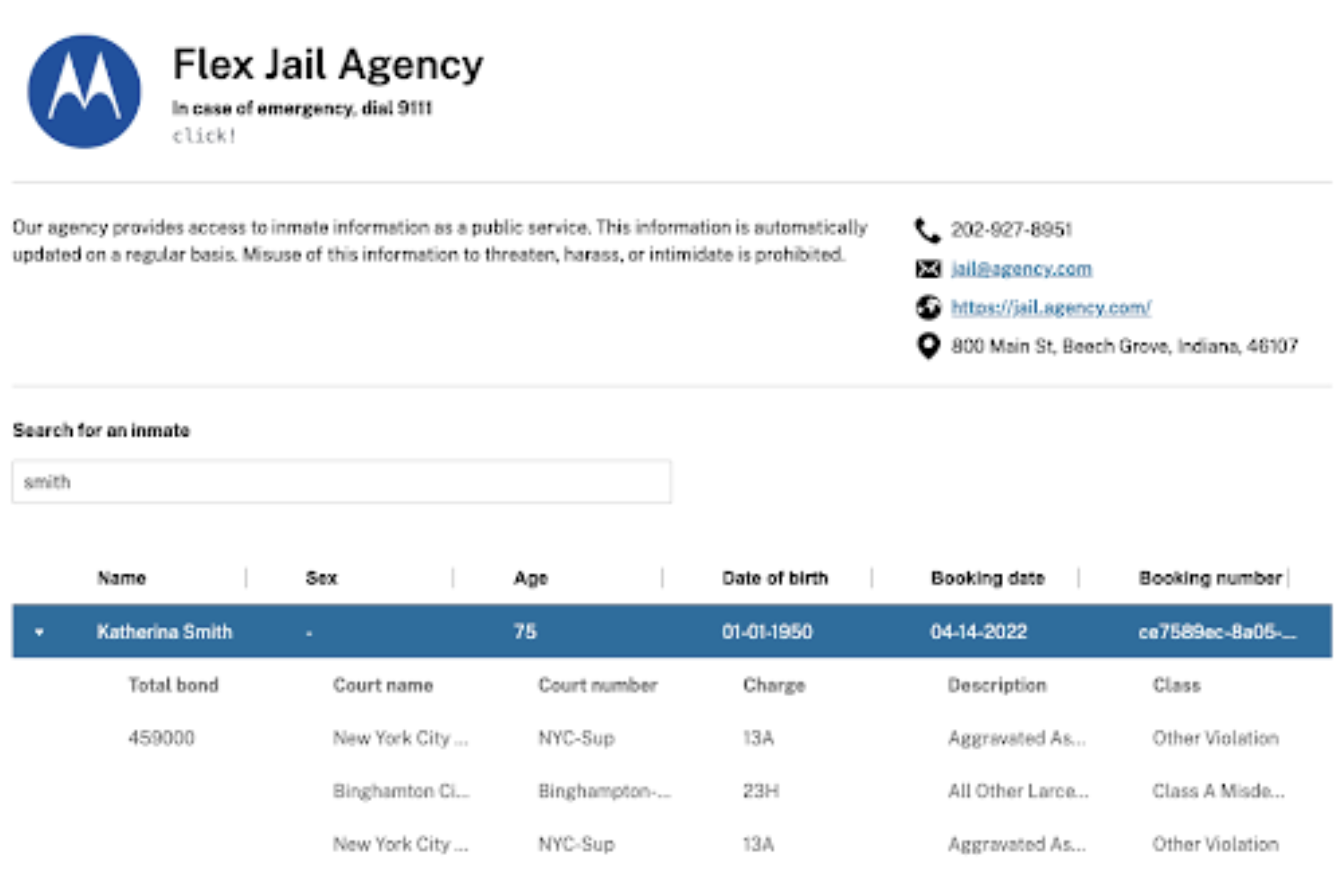
Starting in Q2, agencies will have the ability to display inmates online to the public using CityProtect. This will hopefully cut down on calls to the jail, allowing citizens to see for themselves who is incarcerated, why they are incarcerated, and check their bonds. The information displayed on the webpage is 100% controlled by the agency in order to provide you with the control you need to make the webpage fit your community’s needs.
This update does require Hybrid Activation through cloud services. It’s also important to note that this is a paid service or included as part of the jail functionality in a Flex subscription.
Online Pre-Booking Form
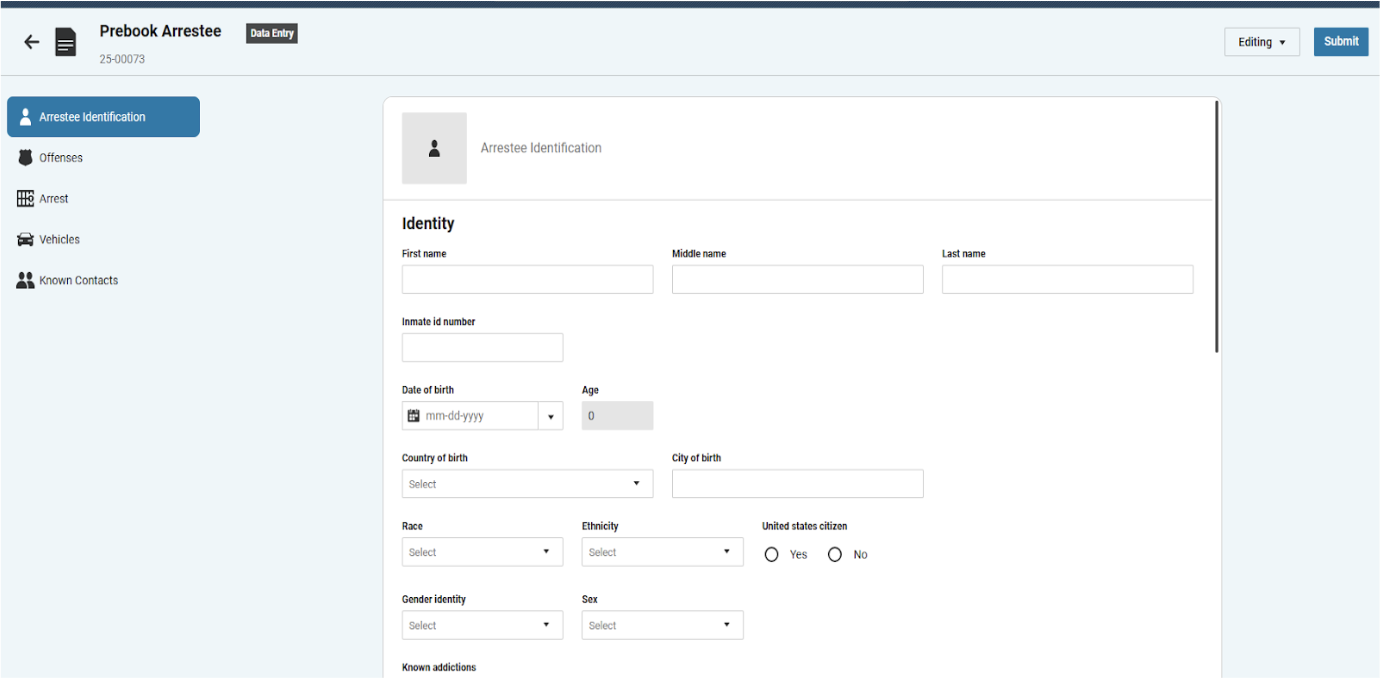
Also starting in Q2, this update will allow third parties and other partners that our agencies work with, who are not on the Flex system, to create a pre-booking form. The third-party officer will come to the webpage with a pre-booking form that they can fill out. The form will then be pushed to the jail, where the jail personnel can review the booking and either accept or reject it. If they accept, it will push into Flex Jail. If they reject the booking, it will be sent back to the arresting officer, allowing them to compile the needed information before they resubmit.
This update also requires Hybrid Activation through cloud services.
Go back to the top ↑
Flex IBR
Tribal / Federal IBR
We have a number of tribal and federal customers who need to report directly to either the Bureau of Indian Affairs or the FBI. Starting in 2025.1, Flex now includes an agency type for Tribal and Federal. This will allow these customers to submit NIBRS directly to these organizations rather than to the State.
This requires a standard IBR setup. Use the apagncy setting to select the Tribal or Federal agency type.
Lesser Inclusive / Mutual Exclusive
This update is one we have been working on for a while, but as of 2025.2, it is now finished. This update will be available for most states in either 2025.1 or 2025.2, but there are a few states where it is available in earlier versions. When turned on, this feature gives officers and IBR clerks the ability to not include lesser-inclusive or mutually exclusive crimes in a report. This makes it much easier to submit NIBRS without receiving errors. If it’s a true mutually exclusive crime, Flex will give the user a checkbox to determine which offense they would like to send. Lastly, this update also allows users to add a victim for society crimes.
To set up this feature, go to Adminutil and use the Module.IBR.AllowSelectedOffenseVictimNotSendToIB setting.
Go back to the top ↑
December, 2024
Flex Platform | Flex CAD | Flex GIS | Flex Apps | Flex Records | Flex IBR
Flex Platform
View TOTP Registration Code
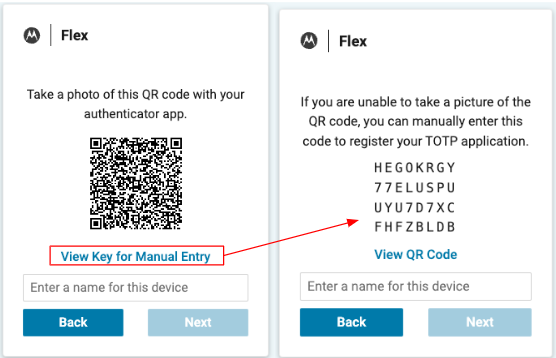
In 2024.3, we released TOTP as one of the authentication methods for Flex. In 2024.4, we’ve enhanced that experience, specifically for agencies and/or departments that do not allow cell phones in their facility. Now, rather than having to take a photo of a QR code with their authenticator app, users can view the TOTP registration code and manually enter in that code when registering a TOTP authenticator.
All you have to do is select the “View Key for Manual Entry” link under the QR code to view the code. Once you manually enter the code (which is all of the lines together), it will automatically register the TOTP application.
Failed Login Time Window
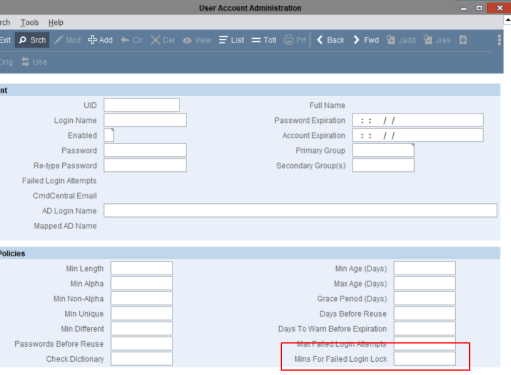
In continuing our login updates to Flex, 2024.4 now includes a new feature for SAAs called Failed Login Time Window. This addresses a CJIS security policy requirement to ensure each user has a maximum number of failed login attempts and that, if those attempts occur within a certain time window, the user is locked out. Please remember that Flex cannot automatically unlock after a certain time period, which means administrators will have to manually unlock the account per CJIS requirements.
Within syusradm, Flex SAAs will find the new Mins For Failed Login Lock field. This feature works in conjunction with the Max Failed Login Attempts field. If this new field is blank or “Off”, this feature will be turned off.
Go back to the top ↑
Flex CAD
Search Name in CAD Comments
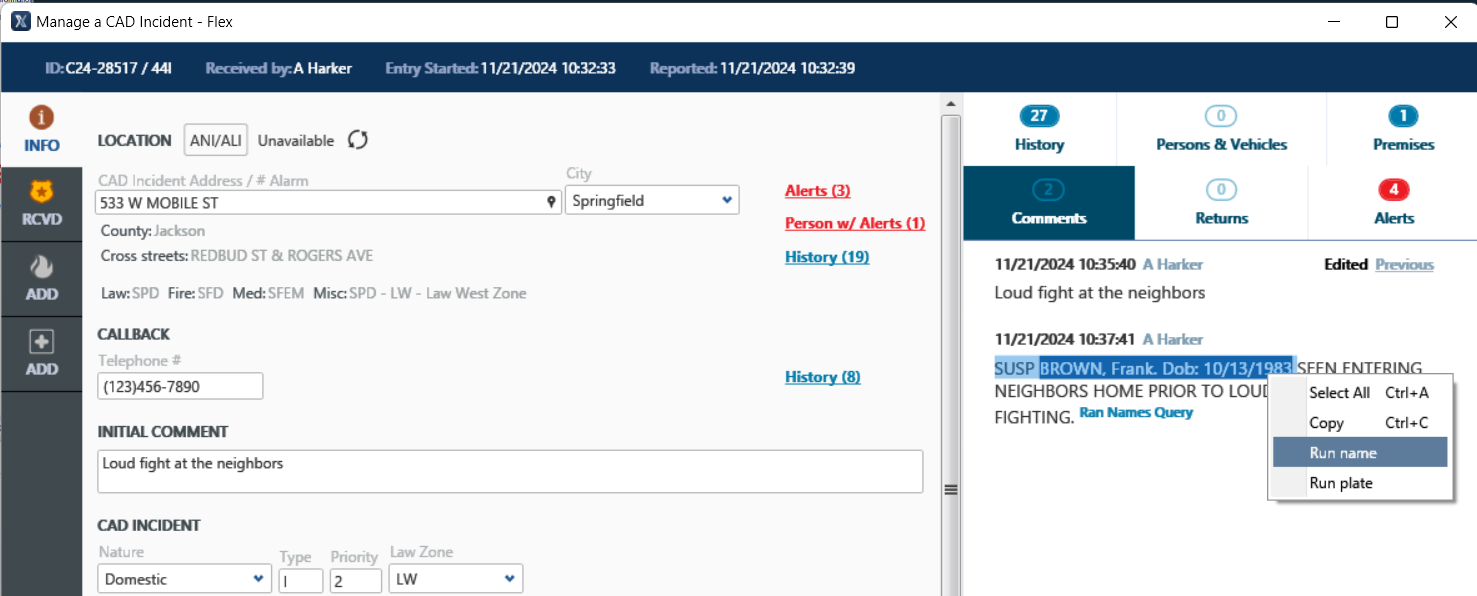
We’re excited to announce this newest enhancement in Flex CAD, which is the ability to run names from the comments section in CAD. As a telecommunicator is entering a CAD incident and including information about a person in the comments field, they can now highlight that name, right click and select “Run name” from the drop-down menu. This will save time by having the system automatically run the query without the user having to rekey information.
This new feature can be turned on and off via the Module.CAD.CAlltaking.RunNamesFromComments setting.
Go back to the top ↑
Flex GIS
ArcGIS Server 11.3 Support
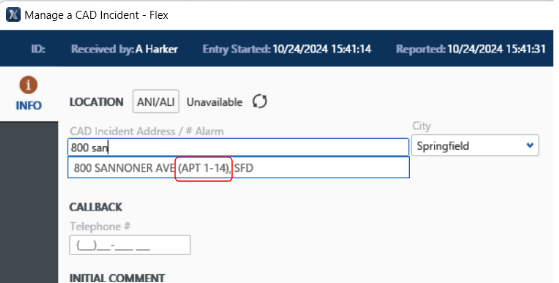
Starting in 2024.4, we will begin supporting ArcGIS Server 11.3 for all GIS functions, such as mapping, address validation, routing, and zone assignment. This is one of the latest changes we’ve made to ensure we keep current with ESRI products, and we encourage all of our customers to do the same. This will enable some additional functionality with address validation. For example, it will show sub-unit range information as suggestions while the user is typing, allowing for quicker unit selections.
Please note that to use ArcGIS Server 11.3, you will need to first migrate to ArcGIS Pro if you haven’t already done so.
Eagle-View Oblique Imagery Viewer
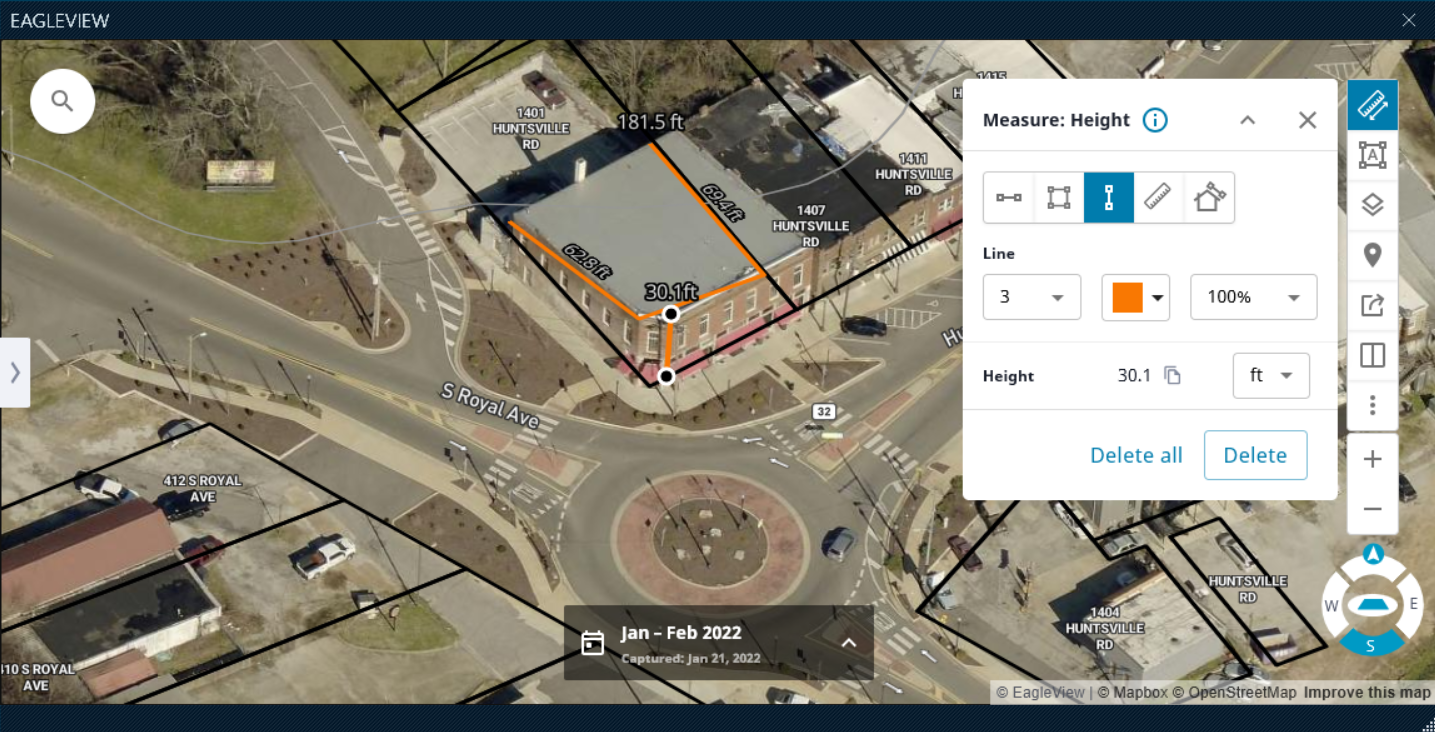
Another GIS update in 2024.4 is in regards to Pictometry. We have moved Pictometry over to the Eagle View Oblique Imagery Viewer. As a reminder, with the 2024.4 upgrade, the underlying architecture moves to .NET8. Unfortunately, Pictometry’s classic viewer is not supported on .NET8. This means that, if you use Pictometry, you will need to move to their new EagleView oblique imagery online viewer. This will become the new Mobile map starting in 2024.4. Since this is a browser-based viewer, it does not require that you have local image warehouse files loaded on the laptop.
Before you upgrade, you will need to reach out to EagleView and get some information from them so that you can use the viewer. There’s a client ID, a client secret, and a token URL that you will need to enter into the settings area before you can set it up. This will help mitigate any downtime for Eagle View imagery.
Go back to the top ↑
Flex Apps
Touch: State Returns & ANI/ALI
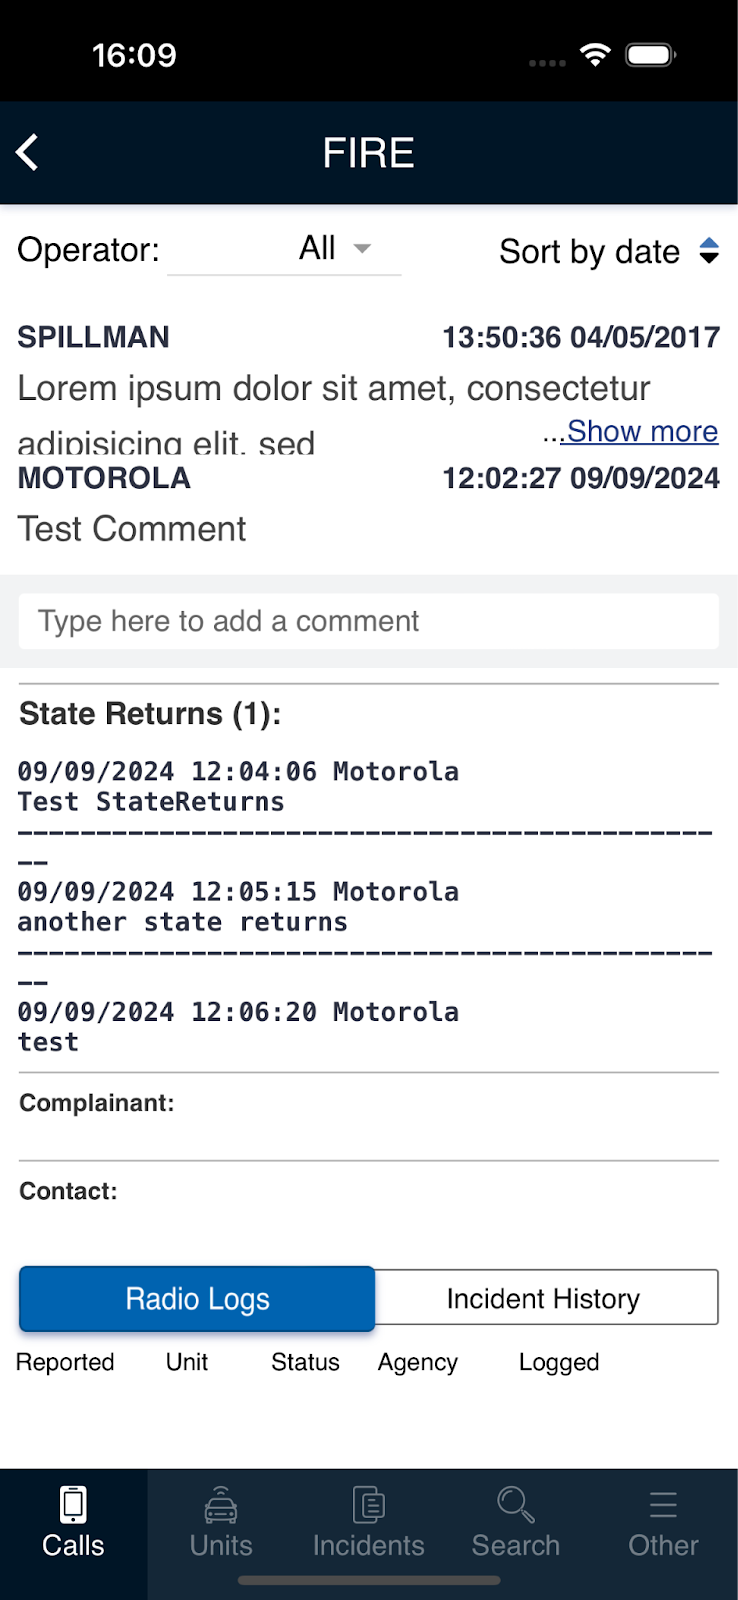
On Flex Touch, we’ve reintroduced the ability to view state returns and ANI/ALI data that’s been attached to a CAD call by a dispatcher. This will allow officers who are using Touch to see those state returns and ANI/ALI information, increasing officer awareness and improving data flow throughout the agency. The state returns, and ANI/ALI information will be displayed in the same format as it comes in, keeping with a fixed-width font.
To enable this, you’ll use the same sypriv as you did back in the earlier version of Touch: touchstatereturn. Simply add this with view access to the user, group or agency that you want to enable. This is not something that requires a new web app as long as your agency is within the last three versions of Flex.
Go back to the top ↑
Flex Records
Incident Summary Field
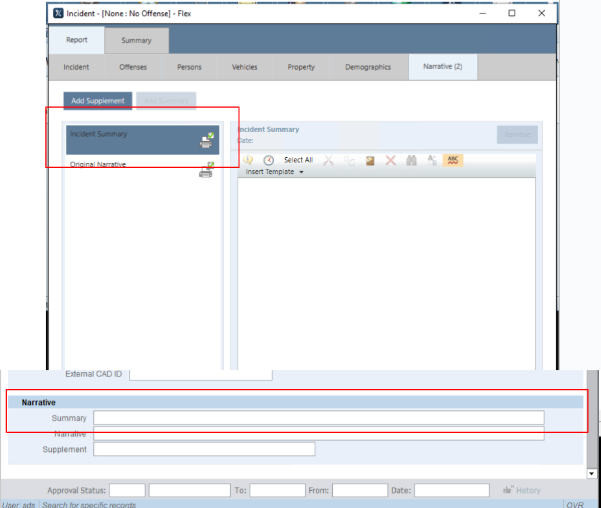
We’re excited to announce that we now have an Incident Summary field in law incidents within Flex. This appears in Mobile Law Incident and the Law Incident Screen for desktop. This can be used by agencies who want a one-two sentence summary that can be used to brief supervisors or be released to the media. Many agencies have found workarounds for this in the past, and we’re excited to bring officers a consistent, dedicated space for that summary.
This follows the same permissions as chkprnt, or you can use lwmsum sypriv. In Mobile Law, we’ve added a new setting in Admin Util where you can automatically add the Incident Summary at the beginning of every call, just like it does with Original Narrative. You can also turn that off so that users have to actually press the button to add the summary. You can find that setting at module.fr.AutoAddSummarytoIncident.
DL Issue Date
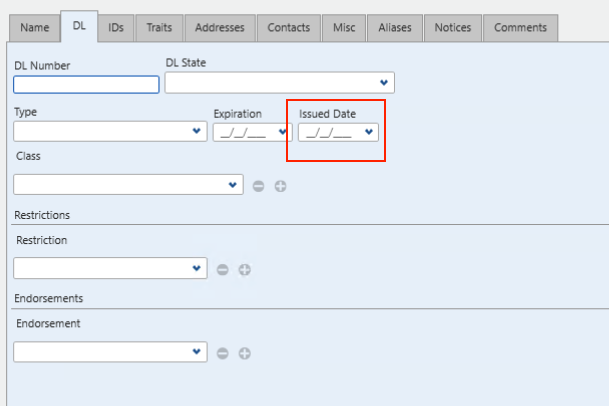
The other update we’ve made in Flex Records is that we’ve added a “Drivers License Issued Date” field to the DL Info screen on Flex Mobile and desktop. Some states return a DL Issued date with state returns, and there was never a place in Flex to store that data. This has been a particular pain point for our customers whose states require an Issued Date when issuing a citation. Now, patrol officers can easily utilize this new field in both the Mobile Names table as well as the DL info table on Flex desktop.
This field is optional and will be automatically activated for everyone.
Go back to the top ↑
Flex IBR
Workflow to Batch
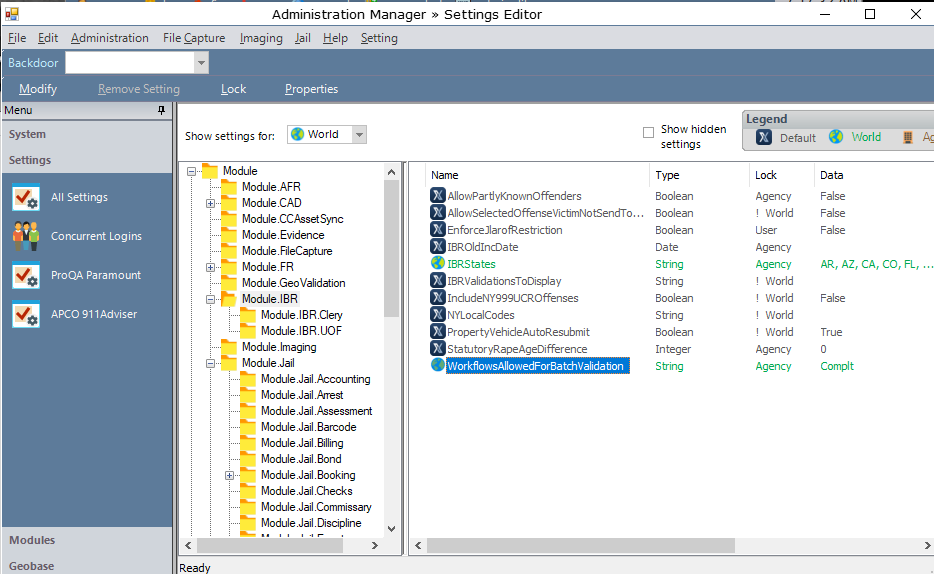
Starting in 2024.4, agencies will have the ability to manage what comes into their batch validation for incident reports. This will enable reports to go through a workflow process and be reviewed by a supervisor before they go into batch validation.
To enable this, go to the Adminutil setting module.IBR.WorkflowsAllowedForBatchValidation and set the status that you want each incident report to reach before it shows up in batch validation. If an incident report does not reach the specified status, it will not show up in batch validation.
Multiple Offenses
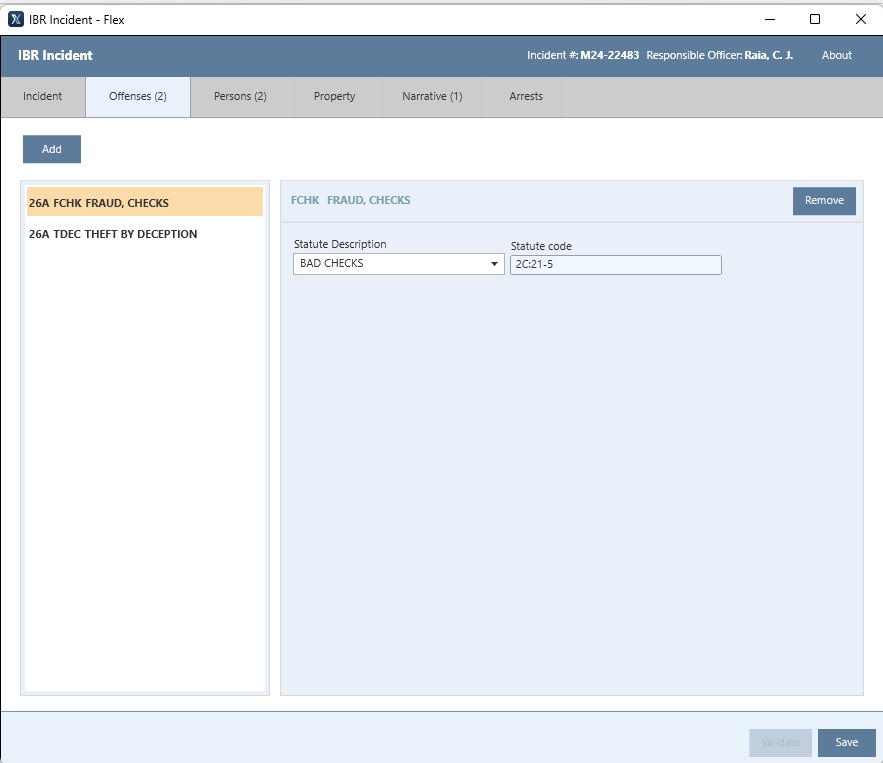
Lastly, 2024.4 brings customers the ability to add multiple instances of the same offenses on the same report without having to go in and change the offense code in order to get it to pass batch validation. When an officer adds in the first offense, they will have the ability to fill out all of the IBR data like normal. When they add the second one with the same offense code, it will appear like it’s a Group B. The officer will not have to fill out the information again because it does not apply. This is solely for reporting purposes, and it will not get sent to the state.
This update has been backed into 2024.2, allowing a few key states to take advantage of this. There are no settings for this change; it is automatically included.
Go back to the top ↑
October, 2024
Flex Platform | Flex CAD | Flex GIS | Flex Records
Flex Platform
New Login Screen With SSL Validation Check
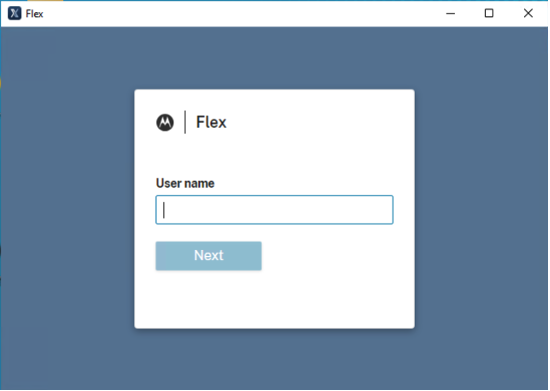
The first and foremost update for 2024.3 is the one you’ll see when logging into Flex. Not only does the new login screen provide a more modern look, but it also builds in the capability for an agency to utilize time-based, one-time password (TOTP). This brings Flex into alignment with CJIS requirements and prepares us for enabling agencies to use their own, existing IdM provider and other login methods in 2025!
The new login screen now requires users to pick their server first, then enter their username. Once users enter their username, they will be presented with a password prompt based on IdM settings. If TOTP is enabled for that user’s agency, then they will be presented with a TOTP prompt once they enter a valid password.
Additionally, Flex now performs an SSL Validation check whenever any user logs on. If the validation check is not successful, the user will be prevented from logging into Flex. This will help agencies ensure CJIS compliance and the overall security of their system.
The updated login screen will be applied across the board, for all Flex users, once an agency upgrades to 2024.3. This new login screen is now the default login screen and is activated automatically. Users will have to select a server before connecting. For the SSL Validation Check, it’s important to note that this feature is not configurable and cannot be turned off. Your agency’s SAA can use the SSL CertCheckUtil to confirm validation and see where the problem is if the check is not successful.
Built-In TOTP
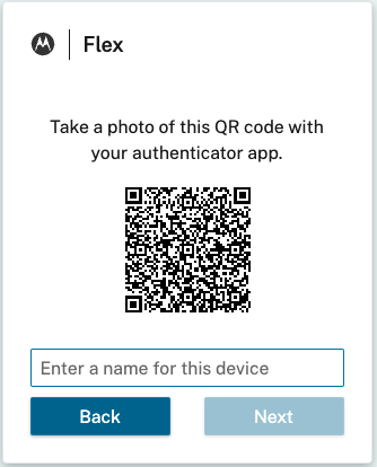
As mentioned, 2024.3 is the first release with built-in TOTP. This highly anticipated enhancement will allow agencies to set up multi-factor authentication (MFA) via TOTP out of the box. To better help Flex customers comply with the new CJIS mandate for all CJI systems to have MFA capabilities, there is no cost associated with this feature; this will be available to any Flex agency that needs MFA but does not want to buy PassKeys.
TOTP integration will be available in Flex desktop, Flex Mobile, Touch, Jail Scanner, and Flex Admin Manager. Integration for the Evidence Scanner will be coming later this year. To enable, simply set Module.MFA.TOTP.Enabled to “True”. This can be set all the way down to the user level, allowing you to be as granular or wide as you need with this MFA functionality.
IdM Integration
Does your agency use a third-party IdM provider such as Microsoft Entra ID, Cisco Duo, Okta or others? We’re actively working on integration with third-party IdM providers so that your users can utilize the same username and password used in other agency applications with Flex. Keep an eye out for this in 2025!
Bomgar Remote Session Link
This update includes a new, direct link to flexsupport.motorolasolutions.com on the Flex desktop, Mobile and Jail screens’ help menu. This helpful link, which is available to all Flex users, will drastically reduce the amount of time customers have historically spent with the Flex Support team just trying to get to the Bomgar Remote Support portal. Now, users can get to the right website in one quick click.
There are no settings that need to be changed; this link is automatically activated. Just look for the “Remote Support” link under the Help menu.
.Net 8
Microsoft will be ending support for .NET 6 in November 2024. With that in mind, we are pleased to announce that Flex is now compatible with .NET 8. CertCheckerUtil has already been updated to check for .NET 8. We know that these changes are not fun for anyone, so we are currently making changes to the Launcher to automatically install .NET moving forward.
It’s important to note that .NET 8.0 must be installed on all Flex clients prior to upgrading to 2024.3+. It can be installed side-by-side with .NET 6.0, allowing your agency to prepare for .NET 8.0 while still enabling backwards compatibility with .NET 6.0 until upgrading.
Go back to the top ↑
Flex CAD
Add Multiple Vehicles in CAD Calls
We’re excited to announce this newest enhancement in Flex CAD, which has been one of the most requested features on our Ideas Portal! Starting in 2024.3, dispatchers can associate multiple vehicles with a call. The plates associated with the call are listed under a new tab called “Persons & Vehicles” in the Incident screen. There are multiple ways to associate a vehicle with a call. Dispatchers can include a license plate in the call comments, or they can manually or automatically run a query. After selecting the result they want, dispatchers can select a button called “Add to Call” and then select which call they want to associate the vehicle with.
To enable the Persons & Vehicles tab in the Incident screen, make sure Module.CAD.CAlltaking.RunNamesFromComments is set to Yes. To enable the “Add to Call” button, make sure the Module.StateLink.RemoveAddToCall setting is set to False.
Go back to the top ↑
Flex GIS
Mobile Map Enhancements
We’re excited to share several Mobile Map updates made in the 2024.3 release. These updates include changes to the sidebar, which can now expand or collapse by clicking on any of the icons or the close button. When the sidebar moves, the whole map and navigation shift so that it doesn’t cover any portion of the map. It’s important to note that the state of the sidebar is saved to the client.
We’ve also added the ability to show and hide both incident and unit labels and icons. This will allow Mobile users to hide some of the clutter when too many incidents or units are displayed on the map. These toggles are located in the Mobile Map settings.
Finally, we have improved the experience for Mobile users who want to select an incident or unit that is in close proximity to other icons on the map. Now, users can right-click on the map to display a list of nearby incidents and units in an area of the map with multiple incident/unit icons overlapping.
Go back to the top ↑
Flex Records
Demographics Screen Changes
Frequently, NCIC, IBR, and Stop Reporting codes for race, sex, gender, ethnicity and color are not always the same. In an effort to streamline the process for Flex users and minimize errors in reporting, we have made a few changes to the Demographics screen. First, we’ve created Demographic screen-specific code tables for race, sex, gender, ethnicity, and color. We’ve also added a few new fields for Perceived Color, Perceived Ethnicity, and Perceived Gender. Lastly, a number of fields in the Demographics screen were expanded to allow the full abbreviations or descriptions of state-mandated fields.
There are no extra settings for this enhancement; the changes will automatically take effect beginning in 2024.3. No existing data will be lost; existing code tables will be copied over to the new code tables, and existing remaining data will now automatically point to these new code tables. It will be up to your agency to modify the new tbrc* code tables to conform to your requirements.
File Capture Screen Changes
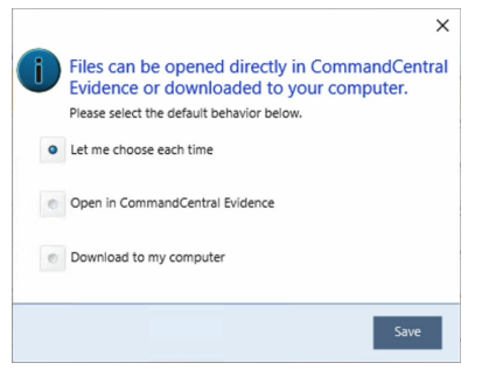
We have many customers utilizing the integration between Flex and CommandCentral Evidence, with some asking for the ability to set default download behavior. To preserve file authenticity, this newest enhancement will allow system administrators to set whether their users are forced to open files directly in CommandCentral Evidence rather than downloading files onto their desktops. Since not every agency will have a preference one way or the other, we have also provided the ability for the end user to make the decision themselves.
For SAA’s to set the default behavior for their agency, go to the new setting Module.FileCapture.downloadBehavior. If your agency does not have a preference and wants to enable the users to make their own defaults, no settings need to be changed.
Go back to the top ↑
For previous product updates not listed on this blog, click here.
In this article
Stay current with the latest Flex update. Discover new features like Unified Identity integration, Windows Server 2025 compatibility, and enhanced reporting for public safety.
- September, 2025 – Release 2025.2 ↓
- June, 2025 – Release 2025.2 ↓
- February, 2025 – Release 2025.1 ↓
- December, 2024 – Release 2024.4 ↓
- October, 2024 – Release 2024.3 ↓
September, 2025
Flex Platform | Flex CAD | Flex GIS | Flex Apps | Flex Jail | Flex IBR
Flex Platform
Unified Identity Integration
We talked about it during Summit 2025, and we’re excited to officially release Unified Identity integration in 2025.3! Unified ID enables your agency to have a single sign-on process for Flex and all other Motorola Solutions products. This will greatly simplify workflows for agencies that use products like CommandCentral or VESTA, and eventually all Motorola Solutions products. We’ve also had a lot of customers asking to connect Flex with their own IDM provider, such as Microsoft Entra. Now, you can! Unified Identity allows you to connect to any OIDC and any SAML IdPs.
This is a big integration and will require help from your Customer Success team to coordinate. Please note that Unified ID integration cannot be done at the time of upgrade, and there may be a wait until resources are available.
Windows Server 2025 Compatibility
Starting in 2025.3, Flex is compatible with Windows Server 2025. This means any agencies looking to do any type of migration, Windows Server 2025 will now be supported. As a note, we are actively working on Red Hat 10 compatibility, but are currently compatible with Red Hat versions 8 and 9.
Report Printing Recorded in Sylog
Historically, in Flex, we have been storing reports, but they’ve been saved in a file on the server, rather than in sylog. Since most agencies are looking in sylog for everything, we updated that experience in 2025.3. Now, anytime you print a report from the reports menu or from the command line, it’s captured directly into sylog. This update is automatically enabled.
Go back to the top ↑
Flex CAD
ProQA Refinements

Over the past year we’ve been working closely with Priority Dispatch to make major enhancements to ProQA in Flex, many of which were released in 2025.1. After the work done this quarter, we’re further enhancing the experience in ProQA for Flex telecommunicators and first responders. This includes things such as improving display codes and suffixes, fixing inconsistent spacing in call comments, adding bullets to descriptions from the EIDS tool, and flagging urgent comments from ProQA as ‘urgent’ in Flex.
We’re excited to be able to push these updates back to 2025.1, helping Flex customers get a better understanding of the information coming from ProQA. There are no settings to enable these updates; they will happen automatically.
Go back to the top ↑
Flex GIS
Intersections on Streets Without House Numbers

The GIS street data maintained by agencies or their GIS authorities does not always have a street range associated with every street segment. In the past, Flex has required users to add a street range to any segment that needed to be part of an intersection, making for a complicated and roundabout process. Starting in 2025.3, this requirement no longer applies, and intersections can be supported on streets without house numbers.
There are no settings required to enable this update. New ‘Location Code’ and ‘Address Type’ fields have been added to gbaddr to support this new functionality.
Flex CAD Map

Big changes that have been in the works for years are coming to the Flex CAD Map starting in 2025.3! We have updated the map to use the latest ESRI mapping technology, just like the Mobile and Pin map, for a consistent experience throughout the mapping suite. The EagleView Map is also now available in CAD, keeping everything you need in one place.
Use the new Module.Mapping.flexCADMap setting to enable this functionality. If you do not enable the setting, Flex will continue to use the existing CAD map for now. We look forward to customer feedback as we continue work and enhance our mapping capabilities!
Additional Base Maps

As part of our changes to the Flex CAD Map, additional base maps have been added to the CAD, Mobile, and Pin maps when using a Mobile Map Package (.mmpk). This is helpful for any map user who wants a larger selection of base maps, such as utilizing a high contrast map if you’re color blind. This will also enable Flex to display base maps from CommandCentral Admin. They are sorted by the user’s most recent base map selections for quick access.
There are no settings required for this update.
Go back to the top ↑
Flex Apps
Flex Scanner App now Available on Apple Devices
You’ve been asking, and we’ve delivered! The Flex Scanner App is now available on iOS devices! Earlier this month, we released the Flex Scanner App on the Apple App Store, where agencies are able to download it at no cost.
The iOS version has feature parity with the Android version, so Evidence & Jail scanning features are on the same app; not only that, but the same system privileges for Android work for iOS as well. Don’t forget, you can now use the device’s camera to take pictures of the barcode; a purpose-built barcode scanner is not required for either the iOS or Android versions of the Flex Scanner App.
Scanner 3.2.0

Starting in version 3.2.0, we’ve added the ability to audit multiple evidence locations in one scan. The app also includes the ability to hide inactive locations, making it easier for users to find the right location, while still being able to make them appear again if needed.
On the Jail side of the app, users now have a redesigned Keep Separate Notices section, including new functionality that lists the violation. It also has an improved background Code Table reloading, which is especially important in ‘keep separate’ instances where you need your data up to date. Finally, we have clearer error messaging to help users understand what the problem is and what to do to fix it.
All of these new features are activated by default based on data in the system.
Scanner 3.3.0

In version 3.3.0, we’ve integrated with Unified Identity, bringing that seamless login experience to the Scanner app. On the Evidence Scanner side of the app, there’s a new feature that will search by incident number, automatically showing a list of all evidence associated with that number and where they are located.
There is also an updated audit report on the app and barcode scanner web app. As part of this, when users scan a location, they will see a list of all items that should be in that location. Finally, there’s now the ability to set Favorite Evidence Locations, Reasons, and Transaction Types. This will help users who often send evidence to the same location or person.
All of these new features are activated by default based on data in the system.
Touch 1.21.0 / 1.22.0

We’ve combined these two versions to bring about some exciting new enhancements to Flex Touch users. Now, officers can create urgent CAD comments from the app, something that was previously only available in the CAD or Mobile experience. Users can now search for names by name number, bringing you right to the specific user you’re looking for. And finally, users can now use their Touch device as an AVL locator, similar to how they would with a mobile device. When it shows up on the map, it will show with a Touch icon to indicate that it’s a Touch device.
Super admins will be able to force the AVL location to be turned on or leave the decision to individual users on whether they want to turn it on themselves. It uses the same settings as the Flex Mobile app.
Touch 1.23

We’re excited to announce a commonly requested feature in Touch 1.23: filtering CAD calls based on related agencies! This will be particularly useful when responding to calls in neighboring jurisdictions. In this release, we’re also including improved login error messaging for quicker understanding, as well as a Touch client session timeout to better meet CJIS requirements.
As a reminder, we have discontinued the Flex Web Client (or the Touch Web Client), and what appears if you try to sign into Touch2 on a web browser. For similar functionality and a better user experience, talk to your Motorola Solutions representative about the CAD Web Client.
Go back to the top ↑
Flex Jail
Visitation

In this newest release of Jail, we’ve added a Relationship field to the visitation appointment screen. This field always existed, but having it in an easier-to-see spot right within the visitation screen should improve the experience for all correction officers. This field will sync with the previous field location as well, making sure everyone is working off the same data. The visitation relationship will also appear when you print reports.
There is no setting needed for this update.
Jail Events

We’re continuing our work on Jail Events in this latest release. Now, in 2025.3, we’ve greatly improved the Recurrence functionality by adding the ability to choose a time period. Previously, if you wanted something to recur every hour or every 30 minutes, users had to build multiple events throughout the day for one event type. Now, users can select how often they want it to occur (such as every 15 minutes, every 20 minutes, every 2 hours, etc.) from a drop-down menu.
There is no setting required for this update.
Go back to the top ↑
Flex IBR
Offense Bonds

In 2025.3, we’re continuing to improve the experience around bonds and warrant fields on the Mobile arrest form. We’ve now included an optional checkbox for patrol officers to select, which will determine whether or not the bond and warrant fields appear.
There are no settings for this feature; it is turned on by default. More updates will be coming in future releases.
Go back to the top ↑
June, 2025
Flex Platform | Flex CAD | Flex GIS | Flex Apps | Flex Records
Flex Platform
New Flex Installer and Launcher

Flex 2025.2 brings big changes to both the Flex client installer and launcher. First off, there’s a brand new installer that uses an updated framework, with fewer dependencies. Not to mention a brighter look and updated branding. This new installer will automatically install any .NET Core updates, saving hours of manually updating hundreds of computers.
The new launcher, also with an updated look, automatically deploys and installs when your clients hit a Flex 2025.2 and above server. It will also install any .NET 8 updates. The best part? After the first install, it will not require administrator action moving forward! That means patches will not require your IT personnel to log in to each computer. This will be a huge help to IT personnel, making it much easier to update all clients. You can even check out the Flex documentation portal for information on how to conduct silent installs.
Go back to the top ↑
Flex CAD
“How Received” and “Priority” Defaults

In 2025.2, users can now set default values for the “How Received” and “Priority” fields on the CAD Incident screen. For example, if an incident’s Priority field is left blank for a nature code, it will automatically pull this new default value. This will save valuable time by pre-filling data. One note of caution is if your agency requires call takers to manually set Priority. You should avoid using this default to ensure the system prompts them to enter that in.
In the Module.CAD.Calltaking.DefaultHowReceived setting, you can either leave it blank or add a value from tbhowrc. If it is left blank, the system will continue to use “T” for telephone. For Priority, you can either leave it blank or add a value from 0-9. These new settings do not impact E911 or other interfaces that set this value.
Level Description and Mutual Aid Contact in Response Plans

This newest update improves dispatching Response Plans. Previously, the new Incident screen lacked descriptions for alarm levels when selecting from the dropdown. Now, these descriptions have been restored, helping users understand what each alarm level represents. Additionally, the Mutual Aid contact information field, which was missing in the new Incident screen, has been brought back. This field often contains phone numbers for contacting neighboring agencies for assistance.
There are no settings to activate these fields; they will be automatically included in Response Plans starting in 2025.2.
Web Links in Special Instructions

We’re all used to utilizing web links on various platforms that we interact with throughout our day. Now, we’ve enabled hyperlinks in the Special Instructions area in CAD. This will be particularly helpful for agencies with SOPs and other documents that are referenced in the Special Instructions section. There are two different ways to show the link: either with the HTML href tag (so that the description text is the link) or by simply pasting the HTML link directly in the area.
There are no settings to activate this functionality; it will be automatically enabled in 2025.2.
Go back to the top ↑
Flex GIS
WMTS Map Services Support

In 2025.2, Web Map Tile Services (or WMTS) are now supported and can be added to Flex map configurations. WMTS is an OGC standard for serving digital maps using pre-rendered tiles. These layers can then be displayed in CAD, Mobile and Pin Mapping, allowing agencies to incorporate these map services that are published by public providers of GIS data.
There are no settings for this feature. All you need to do is select the new WMTS type in map configurations.
Pin Mapping Update

We have updated our Pin Mapping in Flex! Starting in 2025.2, Pin Mapping will make use of the same mapping configurations that are used for the Mobile map and the CAD map, keeping a consistent and intuitive user experience. Users can still search more than 50 tables in Flex that have location information and map that data, but now it will show up on one of the standard map configurations. This continues to be helpful for investigations, command staff or anyone interested in the spatial relationship between Flex data, to better understand where certain activity is taking place.
If your agency is using the classic Pin Map, then you need to set Module.mapping.flexmap to True in order to enable the updated Pin Map. Contact your Account Representative if your agency is interested in more details.
Go back to the top ↑
Flex Apps
Active URL Links

Is your agency a Smart911 user? Or do you simply wish that you could better utilize links added to call comments within Flex Touch? Then this latest update is for you. Beginning in version 1.20.0, Flex Touch will recognize URLs in the Call Comments section and open them via the device’s default web browser. No more cutting and pasting URLs into a new browser. Touch users can quickly click on links that might get added from various Flex integrations, including Smart911, which automatically places URLs in CAD Comments.
There are no settings to activate this functionality; it will be automatically enabled in Touch 1.20.0.
Discipline Specific Comments

We’re bringing the same innovation that you know and love for Discipline Specific Comments in Flex Mobile to Flex Touch. Starting in 1.20.0, dispatchers can now mark comments that they only want to be seen by specific disciplines. This is particularly helpful in keeping CJIS data within comments targeted to users who have the right permissions to view that information.
If your agency already has Discipline Specific Comments turned on and configured, this will automatically start working in the newest version of Touch and follow the existing rules you have set. If not, you will need to enable Module.CAD.CallTaking.EnableDisciplineSpecificComments and configure Module.CAD.CallTaking.DefineMaxCommentVisibility to start using this feature.
Evidence Scanner Improvements
Thanks to many of our customers testing the new Evidence Scanner and providing feedback, we’ve made a number of user experience improvements to the application. First, the Evidence Audit and Movement screens have been enhanced to enable a clickable “Choose Evidence Location” button. We have also updated the login process so that it skips server screens when a server is already configured (both for the Jail and Evidence modules). Finally, we found that many users wanted to be able to scan items before having to select Transaction Type and Reason Code. So, labels can now be scanned at any point once a user is on that screen, allowing users to follow a workflow that best fits their processes.
For those users who missed the ability to complete Evidence audits of multiple locations at the same time, as promised, we brought that feature back!
There are no settings to activate this functionality; it will be automatically enabled in 3.2.0.
Go back to the top ↑
Flex Records
Printing Reports From Mobile

We’ve got a big win for Mobile users this quarter. Now, you can easily print reports directly from Mobile without having to switch to the full Flex Desktop application. No more having to use the Summary tab to print reports! Printing can be done via the Mobile Law Incident Form or Mobile Law Incident View, making printing quick and easy regardless of where you are.
This feature is turned on by default, but you can turn it off in Module.FR.Reports.IsPrintReportsButtonOn. Admins can also define which lwmain reports appear on the dropdown by going to Module.FR.Reports.DefaultIncidentReports and adding the name of the lwmain report they wish to list. A description can be set by adding a – ReportDescription after the report name. Make sure your Mobile users have the “report” sypriv.
Long-term Call ID and External CAD ID in Mobile

With this latest enhancement, we’re making it easier for Flex users to cross-reference CAD information while in Mobile. Starting in 2025.2, the Long-Term Call ID and External CAD IDs will be visible in the top right corner on Mobile Law screens if they exist for the record. These fields were recently made visible on the Mobile Law Incident form when creating or editing an incident. Now, this data will also be accessible when viewing a record, making it easier to verify information without leaving the screen.
There are no settings for this functionality; if the data exists, it will automatically appear on the screen.
Dissemination Screen Updates

In 2025.2, we made a number of minor updates to the Dissemination Screen, which also came directly from customer feedback and usability testing. Now, the Dissemination Method and Dissemination Reason fields have been changed to code tables, which is intended to improve organization and keep everything in a standard format. The Organization, Dissemination Method Description and Recipient fields have also been expanded to be much larger than they were previously, allowing for a better user experience. And finally, in the new Flex UI, users can now add the CAD Call Number and Related Incident.
There are no settings needed to activate these changes. Existing entries in Method were added to dsmeth and existing entries in Reason were added to dsreain.
Go back to the top ↑
February, 2025
Flex Platform | Flex CAD | Flex GIS | Flex Apps | Flex Records | Flex Jail | Flex IBR
Flex Platform
System Logging Turned on by Default

As you may know, in order to start logging on to the Flex system, you have to set the syparams, logmodes and logtables to specific criteria. The CJIS Security Policy requires that all activities on a system like Flex be logged. However, some agencies do not turn on full logging capabilities and do not realize it until it’s too late. That’s why we’ve hard-coded the logging of all tables and all actions into the Flex System Log screen (sylog) beginning with 2025.1. To help SAAs not get confused, we have removed the logmodes and logtables syparams table.
No settings are required; this update happens automatically.
Go back to the top ↑
Flex CAD
Smart911 Integration

One of our main focuses is to integrate Flex with more portions of the Motorola Solutions ecosystem. That’s why we are excited to announce the newest update to that mix: the Flex integration with Rave Smart911! This provides telecommunications and first responders with access to additional citizen information to aid in emergency response – such as members of household, medical information, pets, etc. When a 9-1-1 call is entered in Flex CAD, the number is checked against Smart911. If a matching profile exists, an Urgent comment with a link to the information in the Rave portal is added to the call.
This integration requires a Rave Smart911 CPE server and the CAD Incident Screen with new call comments enabled for both CAD and Mobile. See the Flex release notes for more settings information.
Automatically Search Names in Comments

In 2024.4, we announced the new ability to search names in CAD comments. In 2025.1, we’re taking this one step further by allowing AI logic to read those comments, recognize names, and automatically run the query without the user manually highlighting the name and running a query.
Using the same setting, you can now set “YesWithAutoSearch” in Module.CAD.Calltaking.RunNamesFromComments. Since this functionality should only run on dispatch stations, the system will also check for a valid cdttys entry containing the workstation ID/IP address of the CAD computer.
ProQA Updates

ProQA has been busy making updates to its software. To that end, we’ve enhanced Flex CAD to work with the following description essentials: bicycle, fire boat, water craft, clothing, equipment/supplies, outdoor experience and lost person. When a dispatcher adds information for these items, that information comes over and is displayed in the call comments. Within ProQA’s Admin Utility, users can now specify how they want items displayed in the CAD call comments. To simplify this within Flex, we’ve now added a new “Display as set in ProQA Admin Utility” Key Questions format.
We strongly encourage agencies that use ProQA to set up how the Key Questions will appear in CAD within the ProQA Admin Utility in order to take full advantage of this new functionality.
Go back to the top ↑
Flex GIS
“After” Delay for Automatic Status Updates

Last year, we released the Automatic Status Update feature. This year, we’re enhancing the feature to allow time for an interface to “see” a triggering status and time for personnel to see the status changes. With 2025.1, you’ll see an “After” field in the tb10code table for automatic status updates. A value in this field (in seconds) prevents a unit from switching immediately from one status to another, allowing time for interfaces or people to see the original status. This should help alleviate worries about anything being broken.
There are no settings for this feature; it will be included automatically. The default value for the new field is zero.
Go back to the top ↑
Flex Apps
New Flex Scanner App

We’re excited to introduce our new Flex Scanner App, which combines the Jail Barcode Scanner and the Physical Evidence Barcode Scanner Android apps into one improved app! By combining these two apps, we’re reducing development time for new features and making it easier on your IT department. This app includes the highly requested feature of enabling the device camera for barcode scanning in both the Jail Scanner and the Evidence Scanner. Additionally, evidence locations are now sorted alphabetically and only display the agency’s locations.
You can download this new app, at no charge, from the Google Play store by searching “Flex Scanner” or clicking this link. We’ll be disabling the current Flex Jail Scanner and Flex Evidence Scanner apps on March 31, 2025, so please download the new Flex Scanner app today!
AVL Location of Touch Devices

Starting in March of 2025, via an update to the Touch app, you will be able to display the AVL location of your Touch devices on all of the Flex maps. This means that for the many Fire and EMS agencies that use Touch, their location can now be seen by dispatchers and other first responders. This integrates with AVL manager and can be displayed in CommandCentral Aware as well.
Starting in 2025.2, admins will be able to force the AVL on, on individual devices using system.client.touch.avldefaults, which will be available at the user, agency, group and world level. Device GPS must be enabled via the device OS. iOS and Android will still have system-generated reminders. There is no way for the Flex software to override that, unless your agency is using a form of mobile device management.
Go back to the top ↑
Flex Records
New Flex Records UI Beta

Of course, one of the biggest things we have been working on in Flex Records is the new UI. Now, with the 2025.1 release, the Beta is finally here for all Flex users! Please note that this is not intended to be a full replacement for the Flex Desktop yet; new functionality will be added with every release. However, we invite any agency using 2025.1 to start using it!
One of the benefits of the new UI is its seamless connection with other cloud products, such as Multi-Agency Search (the new InSight-like product) and CommandCentral Evidence. Users can click on those icons and utilize that functionality without ever leaving Flex. Between its sleek design, tabular layout and new dashboard, many features within the new UI will make our customers’ lives easier and more efficient.
Veteran and Citizenship Status Fields

In 2025.1, we also added Veteran Status and Citizenship Status fields on the names table in the new UI and Mobile Names screens. This is another highly requested feature, especially for agencies near military bases or agencies that operate a jail. As you may know, there is already a “Citizenship” field in Flex, which is primarily used to show which country the person is a citizen of. This new “Citizenship Status” field allows users to indicate their status, such as US Citizen, Non-Resident, Green Card Holder, etc. These new fields can also be found on the Flex Jail inmate card.
Since this is a code table, each agency can use this field in a way that is best suited for their processes. The code tables tbvstat and tbcstat must be filled in by the agency.
Evidence Custody Update Alerts

We’ve had a number of agencies accidentally modify hundreds of evidence records without ever meaning to. That’s why we’ve introduced this simple new feature that will bring up a confirmation message any time there are changes made to evidence custody from a list. Users will have to click “Yes” or “No” in order to proceed, confirming that they understand that they are modifying multiple records at a time.
Although there are no settings needed to turn this on – it’s turned on by default – we are asking you, our Flex customers, for feedback: What is the acceptable number of record changes to prompt this message? Currently, this message appears any time there are two or more records being changed. Is that the right cadence? Let us know in the comments!
Go back to the top ↑
Flex Jail
Public Inmate Search in CityProtect

Starting in Q2, agencies will have the ability to display inmates online to the public using CityProtect. This will hopefully cut down on calls to the jail, allowing citizens to see for themselves who is incarcerated, why they are incarcerated, and check their bonds. The information displayed on the webpage is 100% controlled by the agency in order to provide you with the control you need to make the webpage fit your community’s needs.
This update does require Hybrid Activation through cloud services. It’s also important to note that this is a paid service or included as part of the jail functionality in a Flex subscription.
Online Pre-Booking Form

Also starting in Q2, this update will allow third parties and other partners that our agencies work with, who are not on the Flex system, to create a pre-booking form. The third-party officer will come to the webpage with a pre-booking form that they can fill out. The form will then be pushed to the jail, where the jail personnel can review the booking and either accept or reject it. If they accept, it will push into Flex Jail. If they reject the booking, it will be sent back to the arresting officer, allowing them to compile the needed information before they resubmit.
This update also requires Hybrid Activation through cloud services.
Go back to the top ↑
Flex IBR
Tribal / Federal IBR
We have a number of tribal and federal customers who need to report directly to either the Bureau of Indian Affairs or the FBI. Starting in 2025.1, Flex now includes an agency type for Tribal and Federal. This will allow these customers to submit NIBRS directly to these organizations rather than to the State.
This requires a standard IBR setup. Use the apagncy setting to select the Tribal or Federal agency type.
Lesser Inclusive / Mutual Exclusive
This update is one we have been working on for a while, but as of 2025.2, it is now finished. This update will be available for most states in either 2025.1 or 2025.2, but there are a few states where it is available in earlier versions. When turned on, this feature gives officers and IBR clerks the ability to not include lesser-inclusive or mutually exclusive crimes in a report. This makes it much easier to submit NIBRS without receiving errors. If it’s a true mutually exclusive crime, Flex will give the user a checkbox to determine which offense they would like to send. Lastly, this update also allows users to add a victim for society crimes.
To set up this feature, go to Adminutil and use the Module.IBR.AllowSelectedOffenseVictimNotSendToIB setting.
Go back to the top ↑
December, 2024
Flex Platform | Flex CAD | Flex GIS | Flex Apps | Flex Records | Flex IBR
Flex Platform
View TOTP Registration Code
In 2024.3, we released TOTP as one of the authentication methods for Flex. In 2024.4, we’ve enhanced that experience, specifically for agencies and/or departments that do not allow cell phones in their facility. Now, rather than having to take a photo of a QR code with their authenticator app, users can view the TOTP registration code and manually enter in that code when registering a TOTP authenticator.
All you have to do is select the “View Key for Manual Entry” link under the QR code to view the code. Once you manually enter the code (which is all of the lines together), it will automatically register the TOTP application.
Failed Login Time Window
In continuing our login updates to Flex, 2024.4 now includes a new feature for SAAs called Failed Login Time Window. This addresses a CJIS security policy requirement to ensure each user has a maximum number of failed login attempts and that, if those attempts occur within a certain time window, the user is locked out. Please remember that Flex cannot automatically unlock after a certain time period, which means administrators will have to manually unlock the account per CJIS requirements.
Within syusradm, Flex SAAs will find the new Mins For Failed Login Lock field. This feature works in conjunction with the Max Failed Login Attempts field. If this new field is blank or “Off”, this feature will be turned off.
Go back to the top ↑
Flex CAD
Search Name in CAD Comments

We’re excited to announce this newest enhancement in Flex CAD, which is the ability to run names from the comments section in CAD. As a telecommunicator is entering a CAD incident and including information about a person in the comments field, they can now highlight that name, right click and select “Run name” from the drop-down menu. This will save time by having the system automatically run the query without the user having to rekey information.
This new feature can be turned on and off via the Module.CAD.CAlltaking.RunNamesFromComments setting.
Go back to the top ↑
Flex GIS
ArcGIS Server 11.3 Support

Starting in 2024.4, we will begin supporting ArcGIS Server 11.3 for all GIS functions, such as mapping, address validation, routing, and zone assignment. This is one of the latest changes we’ve made to ensure we keep current with ESRI products, and we encourage all of our customers to do the same. This will enable some additional functionality with address validation. For example, it will show sub-unit range information as suggestions while the user is typing, allowing for quicker unit selections.
Please note that to use ArcGIS Server 11.3, you will need to first migrate to ArcGIS Pro if you haven’t already done so.
Eagle-View Oblique Imagery Viewer

Another GIS update in 2024.4 is in regards to Pictometry. We have moved Pictometry over to the Eagle View Oblique Imagery Viewer. As a reminder, with the 2024.4 upgrade, the underlying architecture moves to .NET8. Unfortunately, Pictometry’s classic viewer is not supported on .NET8. This means that, if you use Pictometry, you will need to move to their new EagleView oblique imagery online viewer. This will become the new Mobile map starting in 2024.4. Since this is a browser-based viewer, it does not require that you have local image warehouse files loaded on the laptop.
Before you upgrade, you will need to reach out to EagleView and get some information from them so that you can use the viewer. There’s a client ID, a client secret, and a token URL that you will need to enter into the settings area before you can set it up. This will help mitigate any downtime for Eagle View imagery.
Go back to the top ↑
Flex Apps
Touch: State Returns & ANI/ALI

On Flex Touch, we’ve reintroduced the ability to view state returns and ANI/ALI data that’s been attached to a CAD call by a dispatcher. This will allow officers who are using Touch to see those state returns and ANI/ALI information, increasing officer awareness and improving data flow throughout the agency. The state returns, and ANI/ALI information will be displayed in the same format as it comes in, keeping with a fixed-width font.
To enable this, you’ll use the same sypriv as you did back in the earlier version of Touch: touchstatereturn. Simply add this with view access to the user, group or agency that you want to enable. This is not something that requires a new web app as long as your agency is within the last three versions of Flex.
Go back to the top ↑
Flex Records
Incident Summary Field

We’re excited to announce that we now have an Incident Summary field in law incidents within Flex. This appears in Mobile Law Incident and the Law Incident Screen for desktop. This can be used by agencies who want a one-two sentence summary that can be used to brief supervisors or be released to the media. Many agencies have found workarounds for this in the past, and we’re excited to bring officers a consistent, dedicated space for that summary.
This follows the same permissions as chkprnt, or you can use lwmsum sypriv. In Mobile Law, we’ve added a new setting in Admin Util where you can automatically add the Incident Summary at the beginning of every call, just like it does with Original Narrative. You can also turn that off so that users have to actually press the button to add the summary. You can find that setting at module.fr.AutoAddSummarytoIncident.
DL Issue Date

The other update we’ve made in Flex Records is that we’ve added a “Drivers License Issued Date” field to the DL Info screen on Flex Mobile and desktop. Some states return a DL Issued date with state returns, and there was never a place in Flex to store that data. This has been a particular pain point for our customers whose states require an Issued Date when issuing a citation. Now, patrol officers can easily utilize this new field in both the Mobile Names table as well as the DL info table on Flex desktop.
This field is optional and will be automatically activated for everyone.
Go back to the top ↑
Flex IBR
Workflow to Batch

Starting in 2024.4, agencies will have the ability to manage what comes into their batch validation for incident reports. This will enable reports to go through a workflow process and be reviewed by a supervisor before they go into batch validation.
To enable this, go to the Adminutil setting module.IBR.WorkflowsAllowedForBatchValidation and set the status that you want each incident report to reach before it shows up in batch validation. If an incident report does not reach the specified status, it will not show up in batch validation.
Multiple Offenses

Lastly, 2024.4 brings customers the ability to add multiple instances of the same offenses on the same report without having to go in and change the offense code in order to get it to pass batch validation. When an officer adds in the first offense, they will have the ability to fill out all of the IBR data like normal. When they add the second one with the same offense code, it will appear like it’s a Group B. The officer will not have to fill out the information again because it does not apply. This is solely for reporting purposes, and it will not get sent to the state.
This update has been backed into 2024.2, allowing a few key states to take advantage of this. There are no settings for this change; it is automatically included.
Go back to the top ↑
October, 2024
Flex Platform | Flex CAD | Flex GIS | Flex Records
Flex Platform
New Login Screen With SSL Validation Check
The first and foremost update for 2024.3 is the one you’ll see when logging into Flex. Not only does the new login screen provide a more modern look, but it also builds in the capability for an agency to utilize time-based, one-time password (TOTP). This brings Flex into alignment with CJIS requirements and prepares us for enabling agencies to use their own, existing IdM provider and other login methods in 2025!
The new login screen now requires users to pick their server first, then enter their username. Once users enter their username, they will be presented with a password prompt based on IdM settings. If TOTP is enabled for that user’s agency, then they will be presented with a TOTP prompt once they enter a valid password.
Additionally, Flex now performs an SSL Validation check whenever any user logs on. If the validation check is not successful, the user will be prevented from logging into Flex. This will help agencies ensure CJIS compliance and the overall security of their system.
The updated login screen will be applied across the board, for all Flex users, once an agency upgrades to 2024.3. This new login screen is now the default login screen and is activated automatically. Users will have to select a server before connecting. For the SSL Validation Check, it’s important to note that this feature is not configurable and cannot be turned off. Your agency’s SAA can use the SSL CertCheckUtil to confirm validation and see where the problem is if the check is not successful.
Built-In TOTP

As mentioned, 2024.3 is the first release with built-in TOTP. This highly anticipated enhancement will allow agencies to set up multi-factor authentication (MFA) via TOTP out of the box. To better help Flex customers comply with the new CJIS mandate for all CJI systems to have MFA capabilities, there is no cost associated with this feature; this will be available to any Flex agency that needs MFA but does not want to buy PassKeys.
TOTP integration will be available in Flex desktop, Flex Mobile, Touch, Jail Scanner, and Flex Admin Manager. Integration for the Evidence Scanner will be coming later this year. To enable, simply set Module.MFA.TOTP.Enabled to “True”. This can be set all the way down to the user level, allowing you to be as granular or wide as you need with this MFA functionality.
IdM Integration
Does your agency use a third-party IdM provider such as Microsoft Entra ID, Cisco Duo, Okta or others? We’re actively working on integration with third-party IdM providers so that your users can utilize the same username and password used in other agency applications with Flex. Keep an eye out for this in 2025!
Bomgar Remote Session Link
This update includes a new, direct link to flexsupport.motorolasolutions.com on the Flex desktop, Mobile and Jail screens’ help menu. This helpful link, which is available to all Flex users, will drastically reduce the amount of time customers have historically spent with the Flex Support team just trying to get to the Bomgar Remote Support portal. Now, users can get to the right website in one quick click.
There are no settings that need to be changed; this link is automatically activated. Just look for the “Remote Support” link under the Help menu.
.Net 8
Microsoft will be ending support for .NET 6 in November 2024. With that in mind, we are pleased to announce that Flex is now compatible with .NET 8. CertCheckerUtil has already been updated to check for .NET 8. We know that these changes are not fun for anyone, so we are currently making changes to the Launcher to automatically install .NET moving forward.
It’s important to note that .NET 8.0 must be installed on all Flex clients prior to upgrading to 2024.3+. It can be installed side-by-side with .NET 6.0, allowing your agency to prepare for .NET 8.0 while still enabling backwards compatibility with .NET 6.0 until upgrading.
Go back to the top ↑
Flex CAD
Add Multiple Vehicles in CAD Calls
We’re excited to announce this newest enhancement in Flex CAD, which has been one of the most requested features on our Ideas Portal! Starting in 2024.3, dispatchers can associate multiple vehicles with a call. The plates associated with the call are listed under a new tab called “Persons & Vehicles” in the Incident screen. There are multiple ways to associate a vehicle with a call. Dispatchers can include a license plate in the call comments, or they can manually or automatically run a query. After selecting the result they want, dispatchers can select a button called “Add to Call” and then select which call they want to associate the vehicle with.
To enable the Persons & Vehicles tab in the Incident screen, make sure Module.CAD.CAlltaking.RunNamesFromComments is set to Yes. To enable the “Add to Call” button, make sure the Module.StateLink.RemoveAddToCall setting is set to False.
Go back to the top ↑
Flex GIS
Mobile Map Enhancements
We’re excited to share several Mobile Map updates made in the 2024.3 release. These updates include changes to the sidebar, which can now expand or collapse by clicking on any of the icons or the close button. When the sidebar moves, the whole map and navigation shift so that it doesn’t cover any portion of the map. It’s important to note that the state of the sidebar is saved to the client.
We’ve also added the ability to show and hide both incident and unit labels and icons. This will allow Mobile users to hide some of the clutter when too many incidents or units are displayed on the map. These toggles are located in the Mobile Map settings.
Finally, we have improved the experience for Mobile users who want to select an incident or unit that is in close proximity to other icons on the map. Now, users can right-click on the map to display a list of nearby incidents and units in an area of the map with multiple incident/unit icons overlapping.
Go back to the top ↑
Flex Records
Demographics Screen Changes
Frequently, NCIC, IBR, and Stop Reporting codes for race, sex, gender, ethnicity and color are not always the same. In an effort to streamline the process for Flex users and minimize errors in reporting, we have made a few changes to the Demographics screen. First, we’ve created Demographic screen-specific code tables for race, sex, gender, ethnicity, and color. We’ve also added a few new fields for Perceived Color, Perceived Ethnicity, and Perceived Gender. Lastly, a number of fields in the Demographics screen were expanded to allow the full abbreviations or descriptions of state-mandated fields.
There are no extra settings for this enhancement; the changes will automatically take effect beginning in 2024.3. No existing data will be lost; existing code tables will be copied over to the new code tables, and existing remaining data will now automatically point to these new code tables. It will be up to your agency to modify the new tbrc* code tables to conform to your requirements.
File Capture Screen Changes

We have many customers utilizing the integration between Flex and CommandCentral Evidence, with some asking for the ability to set default download behavior. To preserve file authenticity, this newest enhancement will allow system administrators to set whether their users are forced to open files directly in CommandCentral Evidence rather than downloading files onto their desktops. Since not every agency will have a preference one way or the other, we have also provided the ability for the end user to make the decision themselves.
For SAA’s to set the default behavior for their agency, go to the new setting Module.FileCapture.downloadBehavior. If your agency does not have a preference and wants to enable the users to make their own defaults, no settings need to be changed.
Go back to the top ↑
For previous product updates not listed on this blog, click here.

